

Video guide
Quick advice
Short on time? Focus on these top steps to get your child set up for safety quickly.
Set up your Family
Setting up Family Sharing and adding your child is a quick way to get set initial restrictions.
Limit screen time
Set downtimes and daily app limits to help your child develop balanced screen time habits.
Restrict content
Set limits on which apps and websites your child can access on their Mac or other iOS device.
How to set parental controls on macOS
You’ll need access to your Apple account and your child’s Apple account. You can also set an account up for them following the instructions below.
If you’ve set up parental controls on another Apple device for your child, those controls should already apply to their Mac.
Setting up parental controls on macOS
Apple uses Family Sharing to help keep your child safe on their Apple devices. See the full Family Pairing guide here.
To set up parental controls:
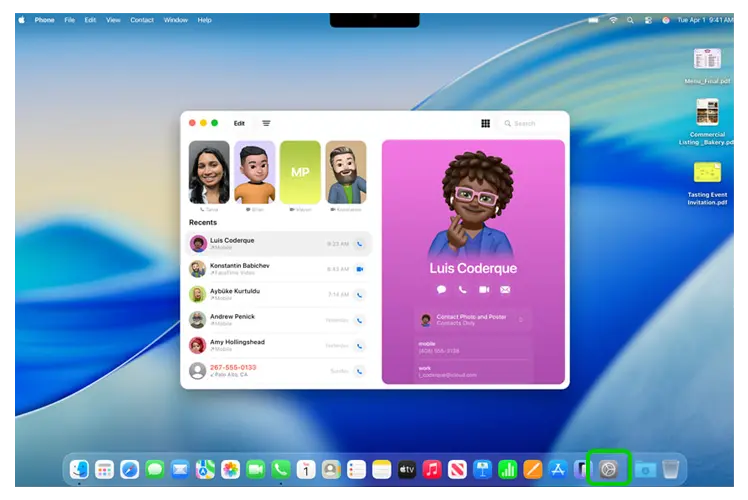
Step 1 – On your or your child’s Mac laptop/desktop, click the gear icon in the menu at the bottom of the screen to open System Settings.
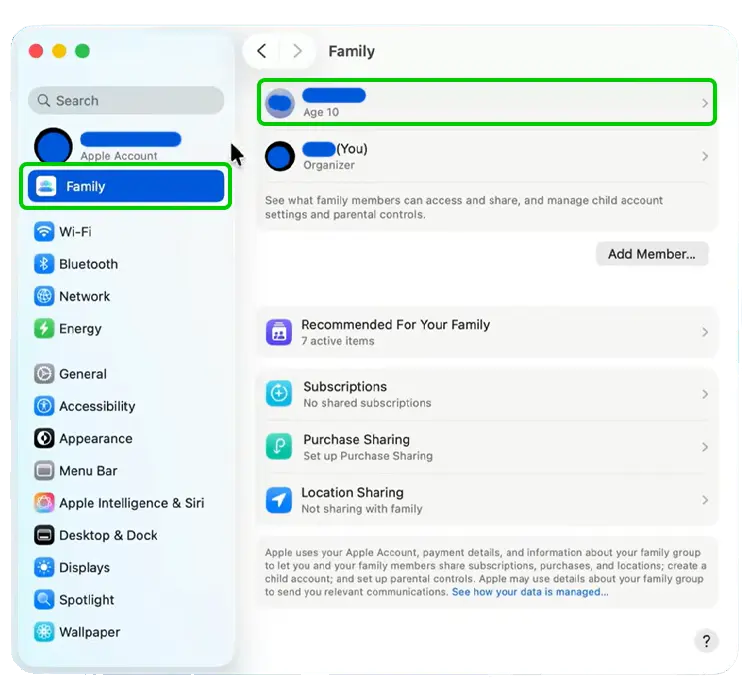
Step 2 – Click on your Apple account name and click Family.

Step 3 – Click Set Up Family.

Step 4 – If your child already has an Apple account, click Invite People and add your child’s information. If your child doesn’t have an account yet, click Create Child Account instead and follow the prompts.
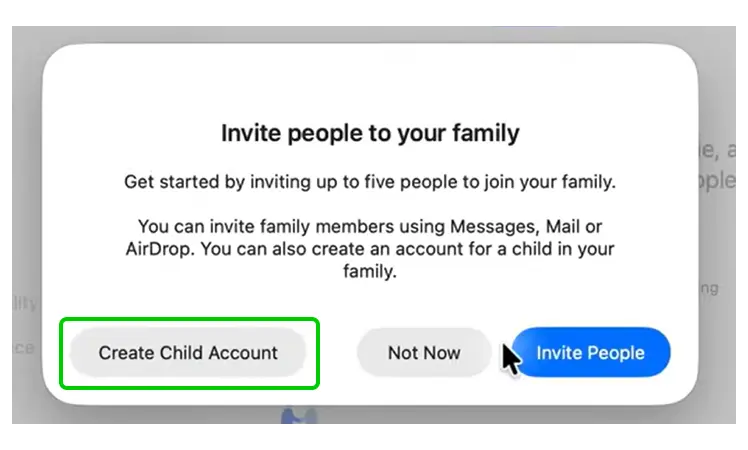
You’ll be taken through options to set up safety features now. However, you can instead select ‘Set Up Later’ to come back to it later.
How to set content restrictions
You can set restrictions on which apps they use, the maturity of the apps they can see, and which websites they can visit.
To set content restrictions:
Step 1 – From System Settings > Family, select your child’s name/account.
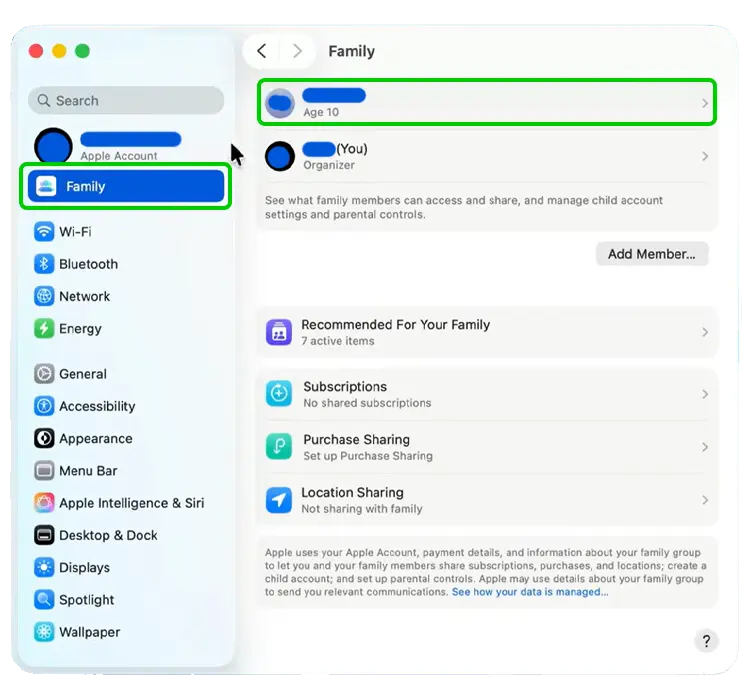
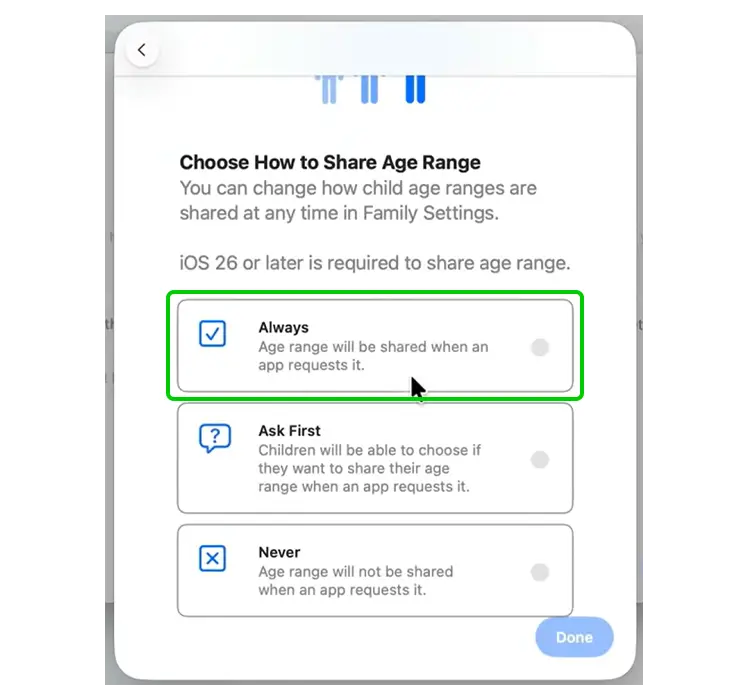
Step 2 – Under Apple Account, click Age Range for Apps.
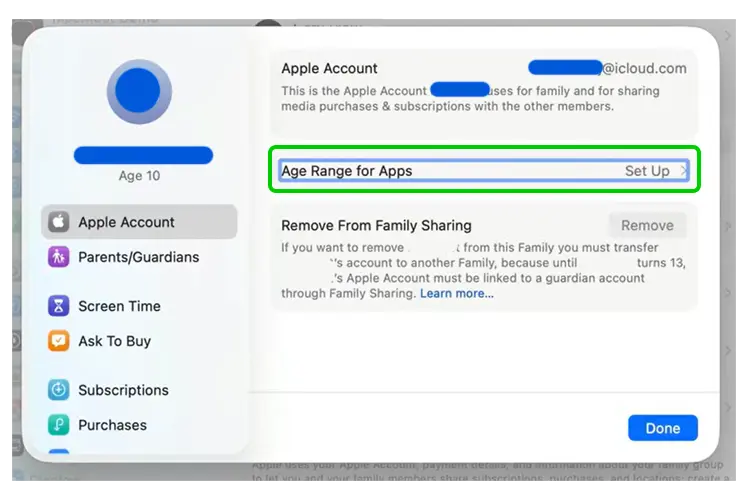
Step 3 – Select Always so that apps with age restrictions can ensure your child meets age requirements. You can also select Ask First or Never. Click Done. Click Done again.
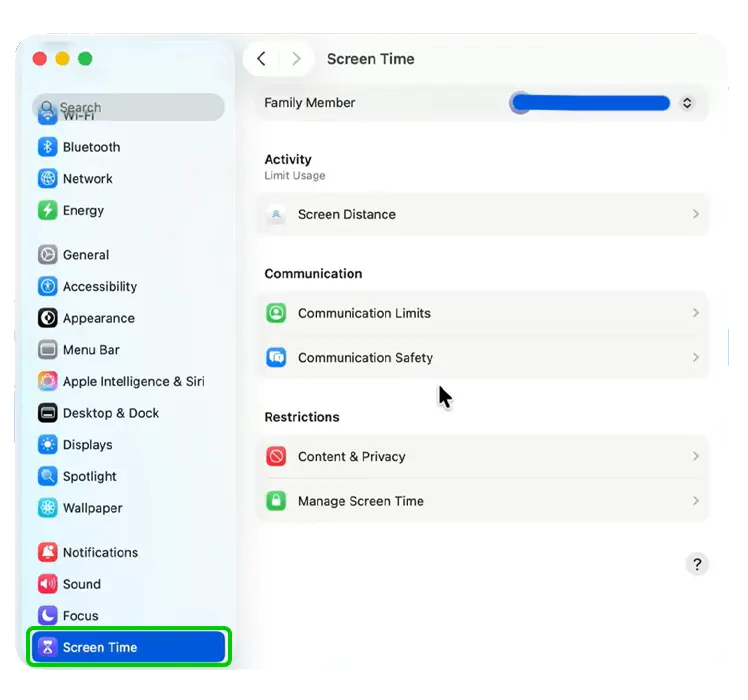
Step 4 – Click Screen Time in the lefthand menu.
Step 5 – Select your child’s name and then Set Up Screen Time for Your Child…

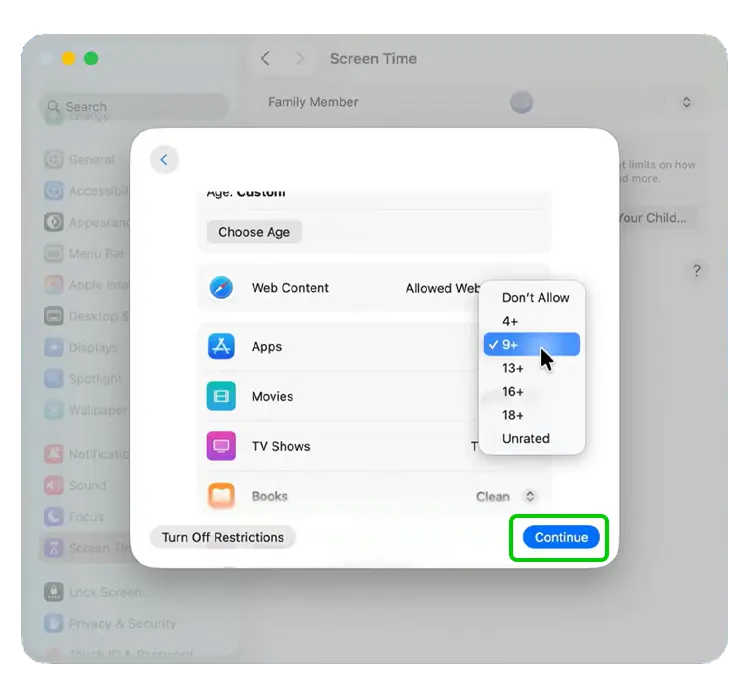
Step 6 – Follow the prompts to set age restrictions, and restrictions across web content, apps and more. Click Continue.
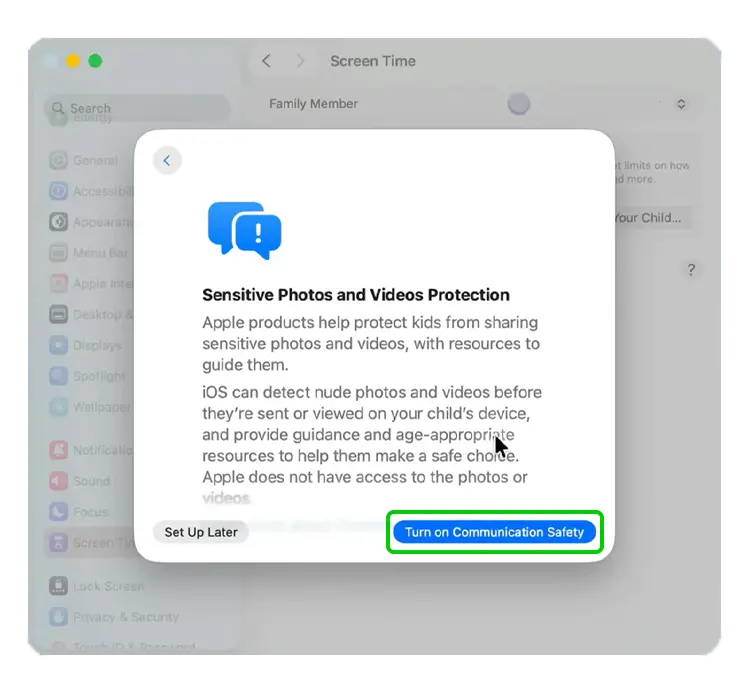
Step 7 – Click Turn on Communication Safety, then Continue. You can also choose Set Up Later for each of these screens instead.
Step 8 – Choose a Start and End time for your child’s account downtime. Most commonly, these are the times your child is sleeping or getting ready for bed. Click Set Downtime.

Step 9 – Create a 4-digit PIN that only you know. Do not share this with your child. Select Continue.
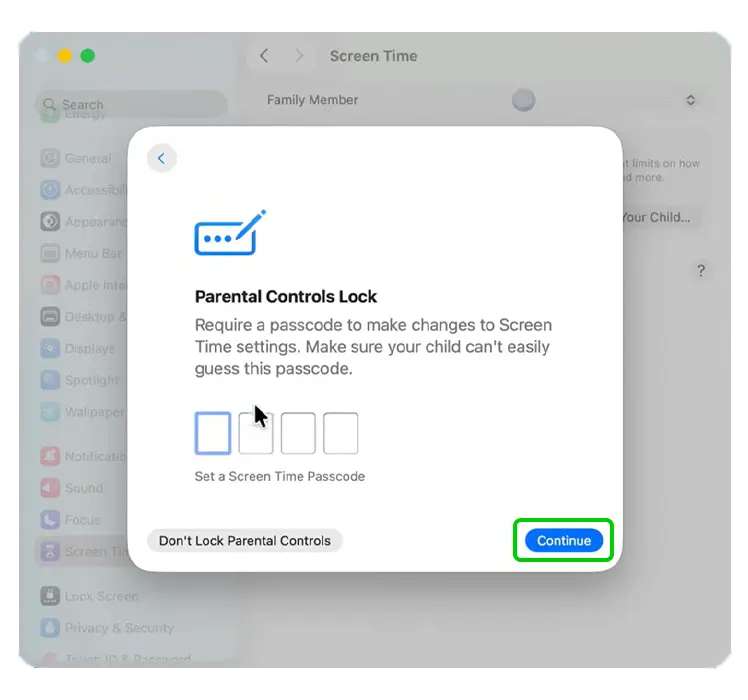
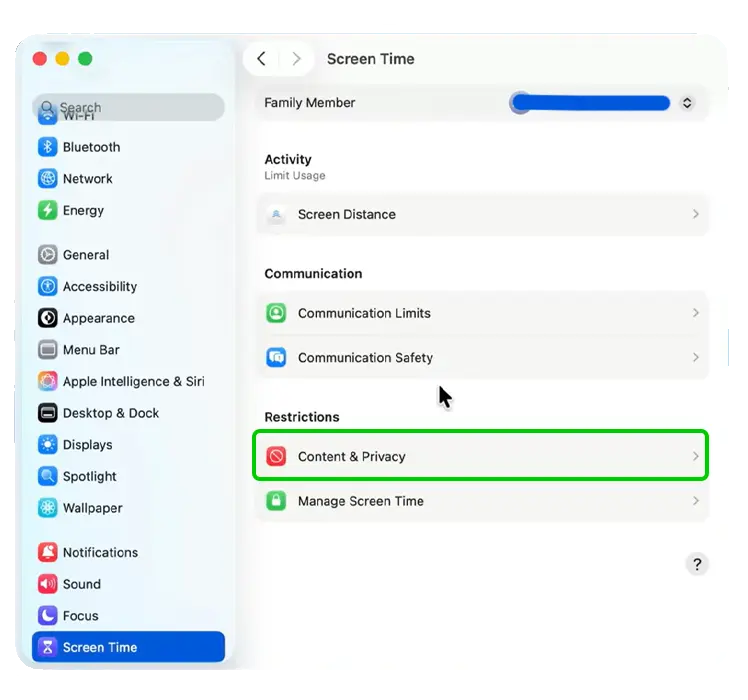
Step 10 – Scroll down to and click on Content & Privacy.
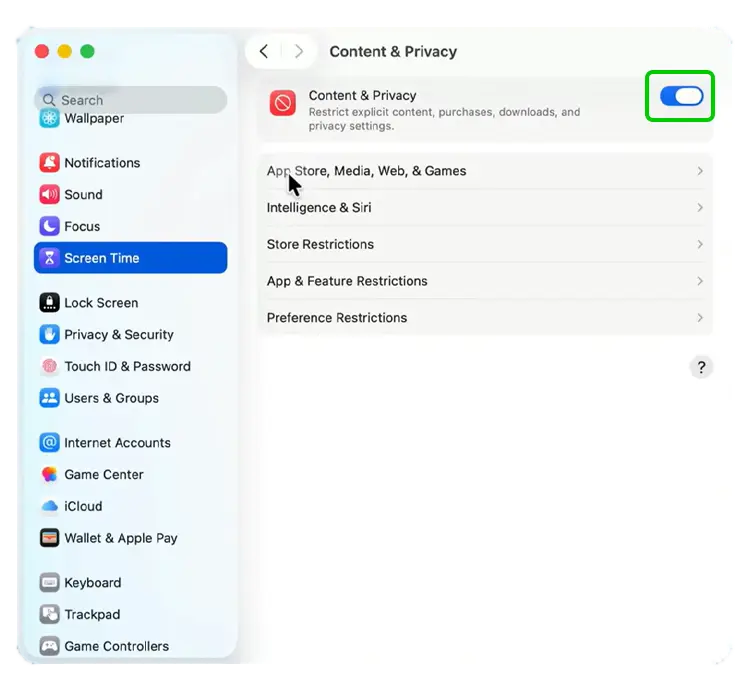
Step 11 – Click the toggle next to Content & Privacy to turn restrictions on.
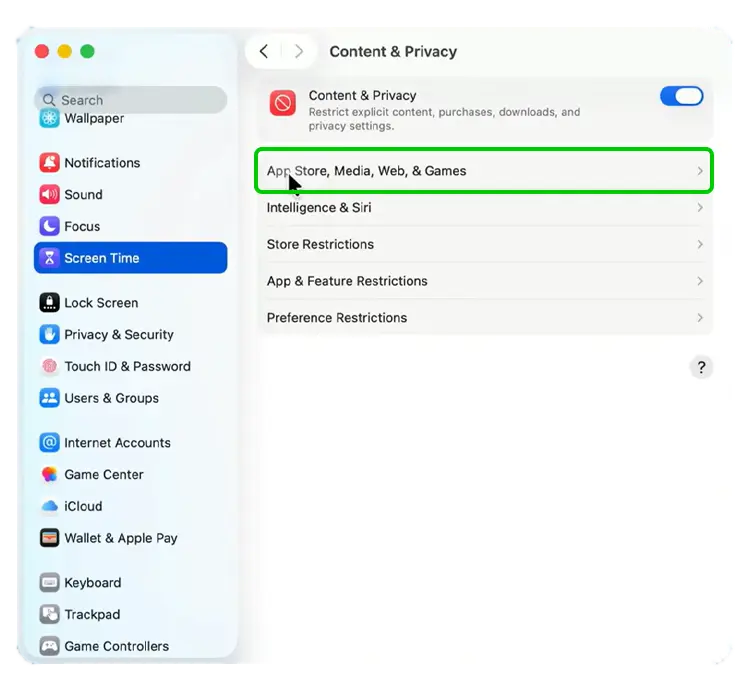
Step 12 – Click App Store, Media, Web, & Games.
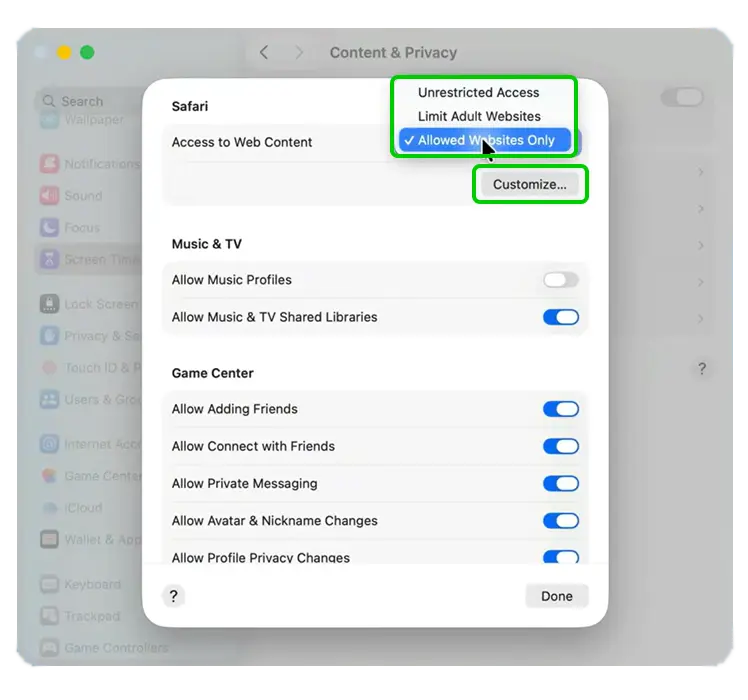
Step 13 – Change Access to Web Content to your preferred setting. If you choose Allowed Websites Only, make sure to click Customise and add which website you’re happy for your child to visit. Click Done.
How to set screen time restrictions
Apple Screen Time is available to all iOS user and works across devices which share the same Apple account. Through Family Sharing, you can customise your child’s Screen Time settings, including setting limits around how long they can spend on their device.
To set screen time limits:
Step 1 – Navigate to System Settings > Family > Screen Time > select your child.
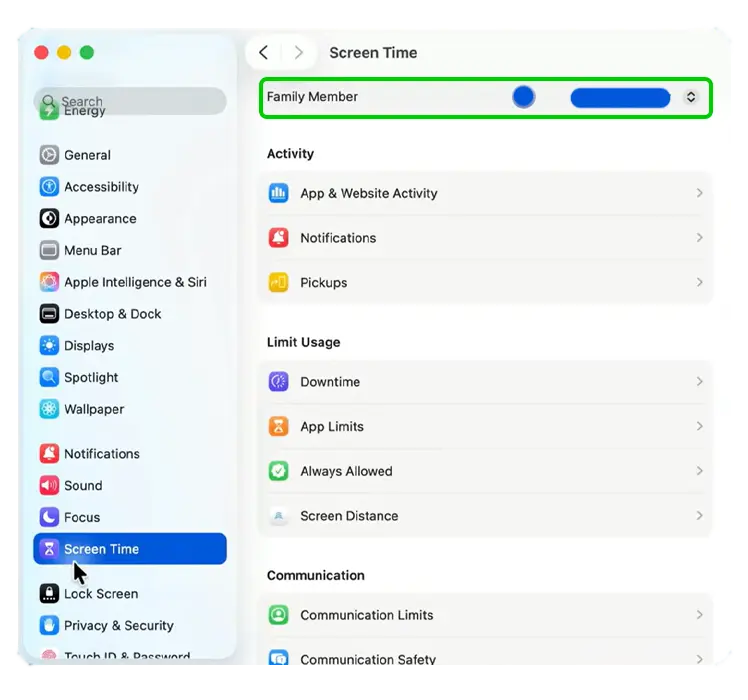
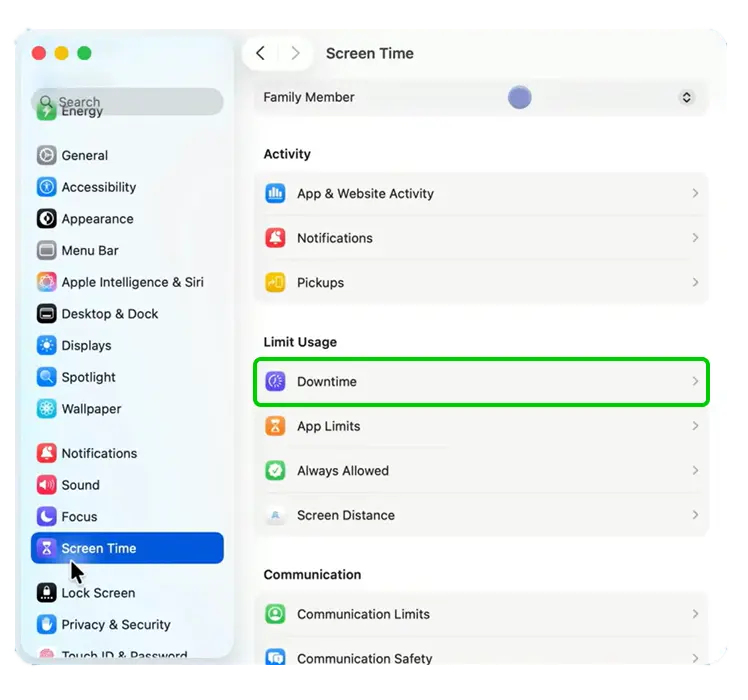
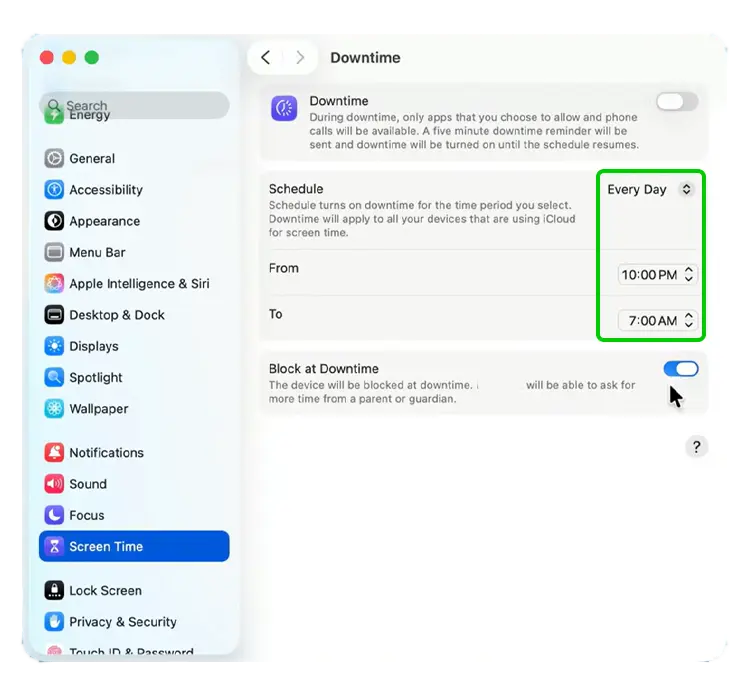
Step 2 – Under Limit Usage, select Downtime.
Step 3 – Click the toggle next to Downtime to turn it on and click the toggle near the bottom of the window, next to Block at Downtime, to turn this feature on too.
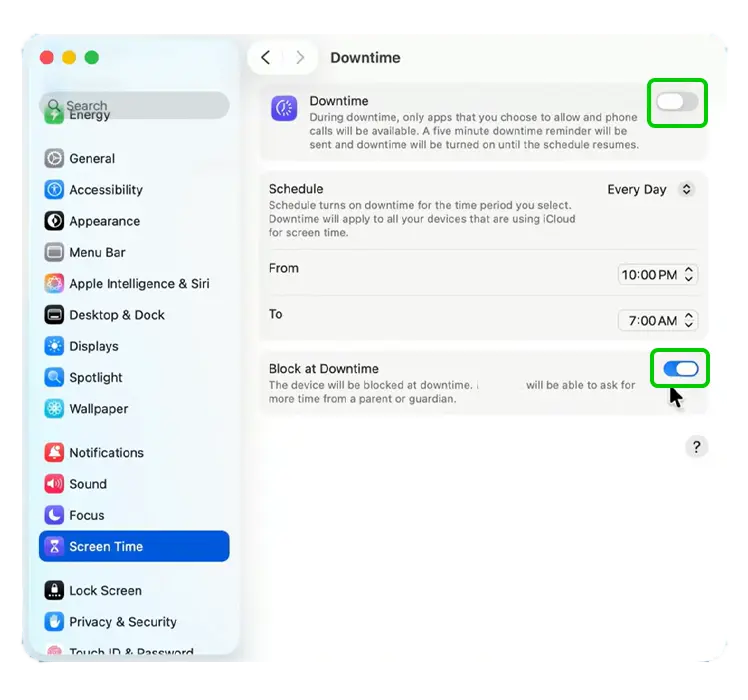
Step 4 – Customise the Schedule by setting a From and To time for when you don’t want your child accessing their devices (such as for sleep).
💡Top tip
Customise the Downtime Schedule for each day rather than Every Day, especially for teens. This lets you ease some restrictions on Fridays and Saturdays (if you’re happy to do so).
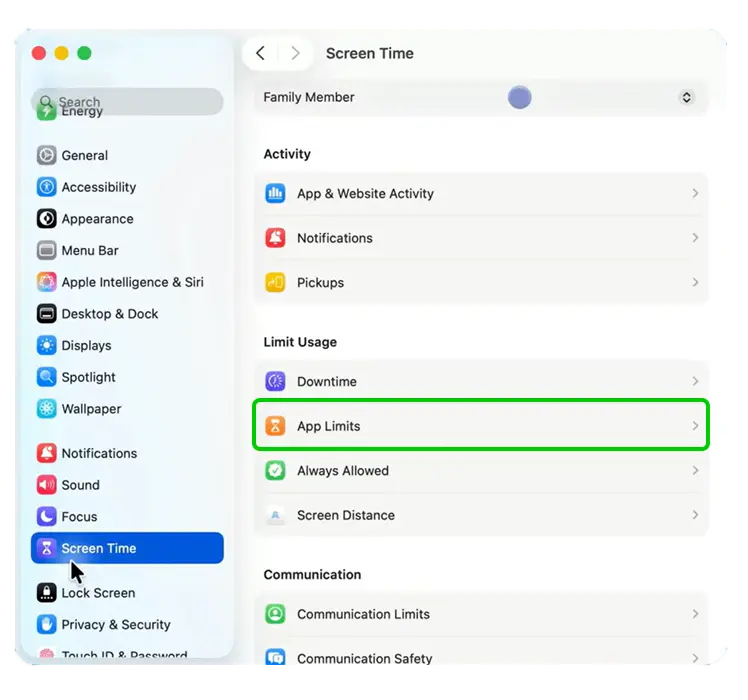
Step 5 – Return to the Screen Time menu and select App Limits.
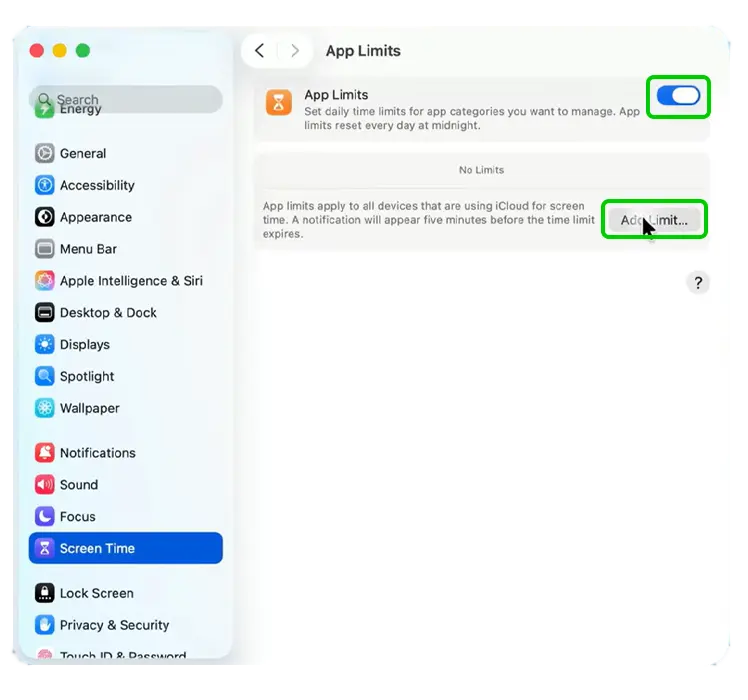
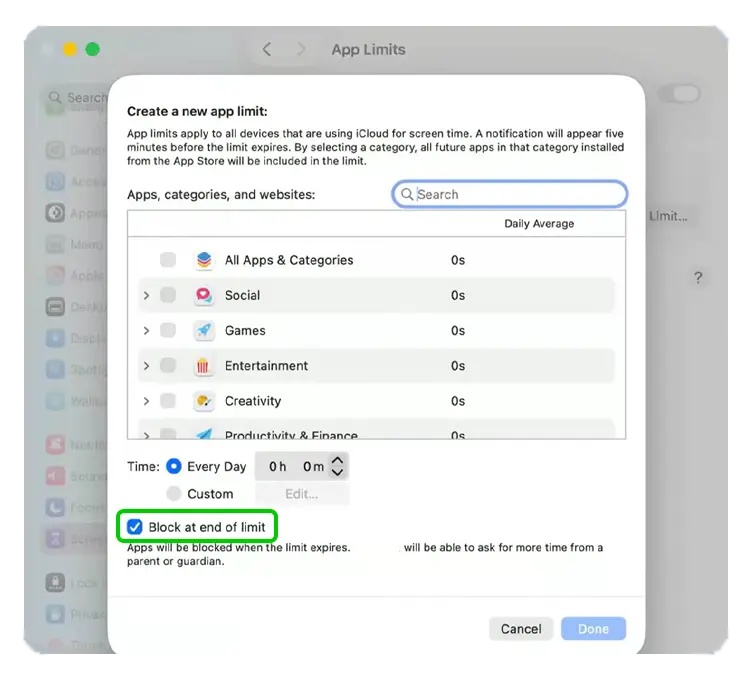
Step 6 – Click the toggle next to App Limits to turn them on and then click Add Limit… to customise your child’s app restrictions.
Step 7 – Search and select specific apps or app categories.

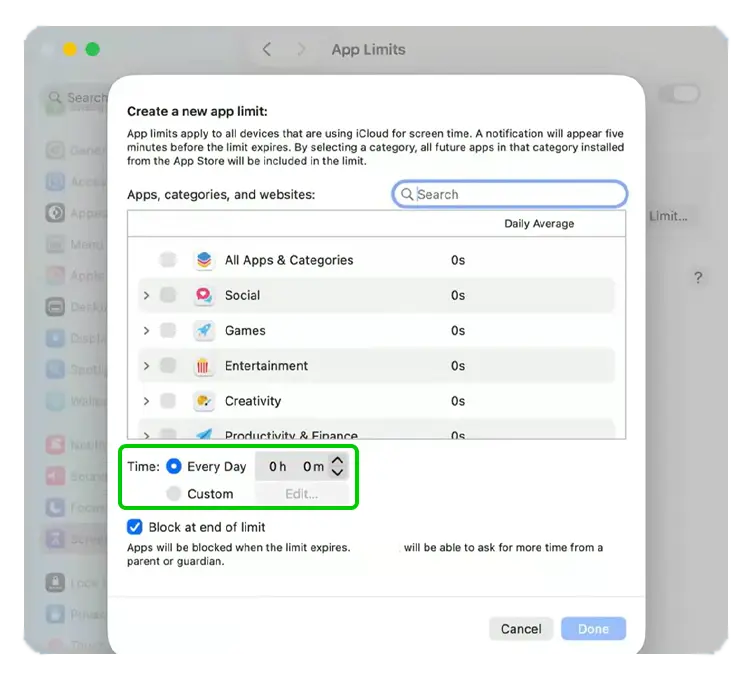
Step 8 – Set a Time limit for the app or category. You can have the same limit Every Day or select Custom to set different limits for different days.
💡Top tip
Set app limits to fit within the overall time limit you set. For example, if you only want them spending two hours on their device per day, make sure the time limits on the apps they use add up to that two hours.
Step 9 – Tick the box next to Block at end of limit and then click Done.
Setting spending limits in the App Store
With Family Sharing, you can set limits on Apple devices to ensure that your child cannot make purchases without your permission.
To set spending limits:
Step 1 – Go to System Settings > Family > your child.
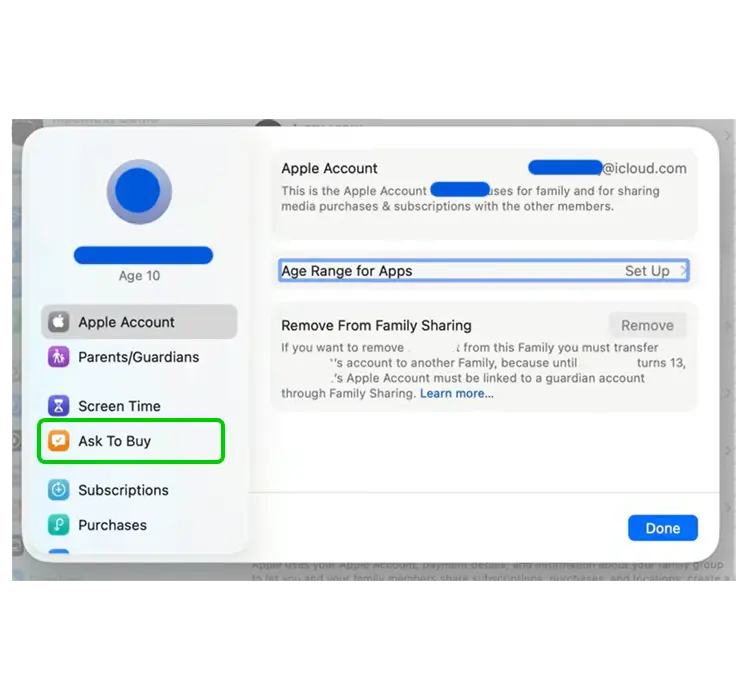
Step 2 – Click Ask to Buy.
Step 3 – Next to Require Purchase Approval, turn the toggle on and click Done.
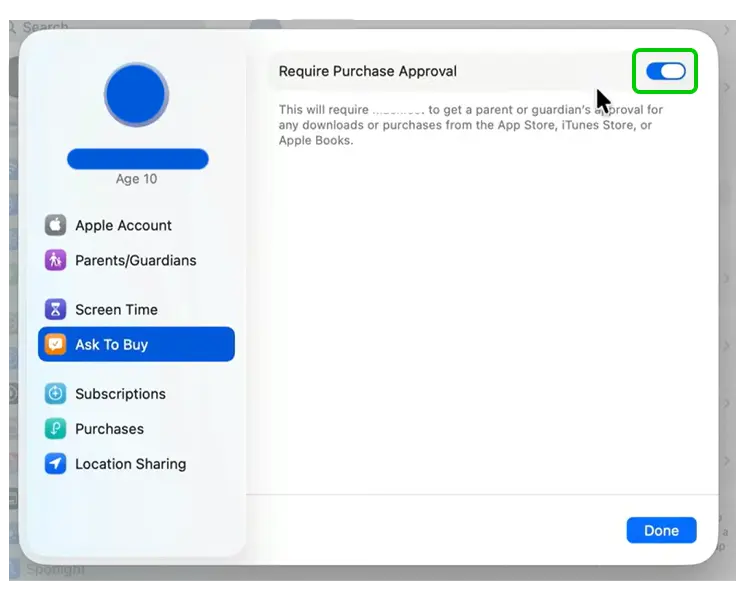
Your child will now need to get your approval for any downloads or purchases across the App Store, iTunes and Apple Books.