Video guide
How to set Family Sharing for Apple parental controls
You will need your own iOS device to set up Family Sharing for your family and set parental controls on your child’s device. If you have an Android device, use monitoring apps to set parental controls on your child’s Apple device.
Both you and your child will also need Apple IDs. In this guide, you’ll learn how you can create an account for your child as well through Family Sharing.
How to set up Family Sharing
How to set up Family Sharing
To set up Family Sharing, both you and your child(ren) must have Apple devices.
To set up a family:
Step 1 – Go to the Settings on your (parent) iOS device and select Family.

Step 2 – Select Continue and then select either Invite Others (if your child already has an Apple ID) or Create Child Account (if you need to create an Apple ID for your child).
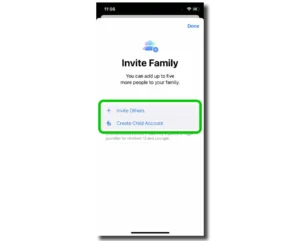
Step 3 – Once you’ve added members to your Family, select Done.

How to create a child account
How to create a child account
When setting up Family Sharing, you will have the option to create a new account for your child. This is only for children under the age of 13.
If your child is 13 or over, you can create a normal account for them here, which you can then add to your Family.
To create an Apple child account:
Step 1 – Go to your Family and select Create Child Account.

Step 2 – Enter your child’s birthdate and select Verify You’re An Adult and follow the instructions for verification. You will need a credit card for this, though you won’t be charged.

Step 3 – Read through the documents that you see before the ID creation page then create an ID/email address for your child.
You may want to consider whether your child will use this email as they grow. If so, consider an email that is appropriate for when they’re older.
Select Continue > Create Email Address.

Step 4 – You’ll be prompted to choose age and content limits. Follow the prompts to complete set up. You can edit these limits later. See the iPhone and iPad parental controls guide here to help you.

Step 5 – Set a 4-digit PIN for the Parental Controls Lock.
This should be something your child cannot guess and should be kept private from them. You will need this PIN to edit parental controls for your child’s device.

How to set Family Sharing for Apple parental controls
View more guides
Discover more parental controls to manage children’s devices, apps and platforms for safer online experiences.