Quick advice
Use these 3 settings to quickly set your child’s iOS device up for safety.
Activate parental controls
Activate parental controls to begin managing their experience on their Apple device.
Enable Screen Time
Enable Screen Time for access to a range of parental controls that go beyond just screen time.
Restrict content
Turn on Content and Privacy Restrictions. Then, you can customise restrictions.
Video guide
How to set up iPhones and iPads for safety
You will need an Apple device which is connected to your child’s iPhone or iPad. See how to set this up with Family Sharing.
Setting up parental controls on your child’s smartphone is a great way to support their online safety. However, parental controls can’t work alone.
Regular conversations, check-ins and consistent boundaries are all also vital to keeping your child safe. See how you can keep your child safe.
How to activate parental controls
How to activate parental controls
To activate parental controls on your child’s phone, you must first set up Family Sharing, which you can learn how to do here.
To set up parental controls on your child’s iPhone or iPad:
Step 1 – From your Apple device, go to your Settings and select Family under your name.
Note: If you don’t see this option under your name, you might still need to set up Family Sharing.

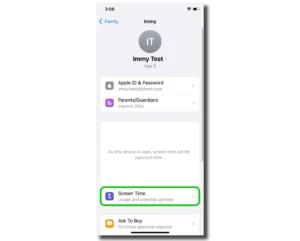
Step 2 – Select your child’s name to open the parental control options.

Step 3 – Here, you can manage screen time, communication, content, spending and more. See the below steps for more information.

How to set Screen Time limits
How to set Screen Time limits
You can set Screen Time limits on your child’s iPhone or iPad using Family Sharing or directly on their device.
To activate Screen Time:
Step 1 – On your Apple device, go to Family and select your child’s name.
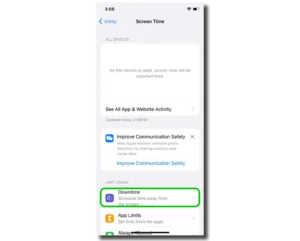
Step 2 – Select Screen Time.
Step 3 – Here, you can monitor your child’s app and website activity. Or you can dive deeper into screen time settings for Downtime, App Limits and more, which you can learn about further in this guide.

How to turn on Downtime
How to turn on Downtime
Apple iPhones and iPads have a feature called Downtime. This lets you set times each day where they cannot use their device. Many parents choose overnight or school hours as the hours they will turn Downtime on.
During Downtime, children will not receive notifications and will not be able to access any apps unless you add them to the ‘Always Allowed’ list. This makes it easier for your child to focus on more important things.
To manage Downtime:
Step 1 – From your child’s Screen Time page, select Downtime under ‘Limit Usage’.
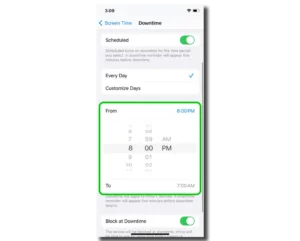
Step 2 – Tap the toggle next to Scheduled to turn on and customise the Downtime schedule.

Step 3a – Select the times (From and To) that you want Downtime active. For example, From 8 PM To 7 AM means Downtime is active during these hours.
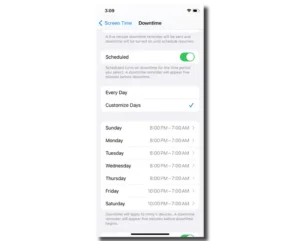
Step 3b – You can set Downtime to Every Day or Customize Days.
You might wish to use Customize Days for different boundaries at the weekend. For example, if your child can stay up later on Fridays and Saturdays, you can customise Downtime to reflect this.
Step 4 – Next to Block at Downtime, tap the toggle. This will mean that when Downtime starts, your child’s device will be blocked.
Depending on your child’s age and ability to follow rules that are in place, you might wish to leave this off.

Where to limit access to apps
Where to limit access to apps
You can use Apple’s parental controls to manage screen time for specific apps. This can be good if you want limits outside of Downtime. It means that your child’s homework app or skill-building app won’t have the same limits as games and social media apps.
To set app limits:
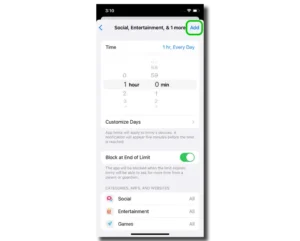
Step 1 – Using Family Sharing, access your child’s Screen Time settings and select App Limits.

Step 2 – Tap Add Limit.

Step 3 – Choose either an app category or a specific app.
Note: You can select a specific app by tapping ‘All >’ next to the relevant app category. For example, to find TikTok, you would tap All > next to Social.

Step 4 – Set a maximum limit for each app or app category. You can do this for Every Day or select Customize Days and give different limits at the weekend, for example.

Step 5 – Tap the toggle next to Block at End of Limit to immediately stop access after the time limit is up.
Tip: Talk with your child about limits and come to a decision together. If they’re struggling to regulate their time, start with larger limits that you gradually reduce to help them get used to spending less time on the app.

Step 6 – Tap Add in the top right corner.
If you ever want to remove this limit, tap the toggle next to App Limits on the main App Limits screen.
How to limit harmful contact
How to limit harmful contact
With Apple’s parental controls, you can set limits which apply to their iPhone, FaceTime, iMessages and iCloud contacts.
To set communication limits:
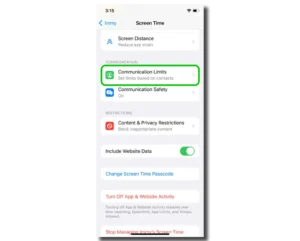
Step 1 – From your Family, select your child > Screen Time > Communication Limits.
Step 2 – Tap During Screen Time.

Step 3 – Change the setting to Contacts Only or Contacts & Groups with at Least One Contact.
We recommend keeping this as Contacts Only until your child is at least 16 or 17.

Step 4 – Tap < Back and select During Downtime.

Step 5 – Select Specific Contacts.
These are people who you are happy for your child to communicate with during Downtime. This might include their parents, siblings or other family members.

Step 6 – Tap < Back and tap the toggle next to Manage [Child’s] Contacts.
Your child will need to accept on their own device. This will let you manage contacts on their device.
Once your child is older, you can give them more freedom to manage their own contacts.

How to limit harmful content
How to limit harmful content
You can limit the chances of your child seeing harmful content in messages and in online spaces with Apple Screen Time.
In this section, see how to:
- Hide sensitive photos
- Restrict access to apps
- Set app store content restrictions
- Restrict websites on Safari web browser
- Customise language on Siri
To hide sensitive photos:
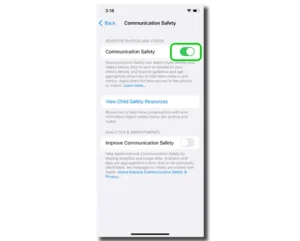
Step 1 – From your Family, select your child > Screen Time > Communication Safety.

Step 2 – Tap the toggle next to Communication Safety (if it’s not already green).
This feature works to detect nude photos and videos that your child is sent or might view on their device. It will also provide guidance and advice on making safer choices.
To restrict access to apps:
Step 1 – Return to the Screen Time menu. Select Content & Privacy Restrictions.

Step 2 – Select Allowed Apps and review the list of apps on your child’s device.
Tap the toggle next to any app that you don’t wish your child to access.
Make sure you discuss why you’re making this decision if your child is older. Offer alternatives where possible.

To set app store restrictions:
Step 1 – Return to the Content & Privacy Restrictions menu and select Content Restrictions.

Step 2 – Review settings under Allowed Store Content. Set limits based on your child’s age and maturity for music, movies, books, apps and more.

To restrict websites on Safari:
Step 1 – Tap Web Content on the Content Restrictions screen to customise what your child can access via the Safari browser.

Step 2 – Choose Limit Adult Websites or Allowed Websites.
For Allowed Websites, you will also need to add the list of websites you’re happy for your child to access. This setting might be very restrictive for older teens, so consider your child’s age when making this decision.

To customise language on Siri:
Step 1 – From the Content Restrictions screen, select Explicit Language under Siri.

Step 2 – Change to Don’t Allow.

Note: If you want to turn off search functions for Siri, you can do that in this section as well.
How to restrict in-game communication
How to restrict in-game communication
Step 1 – On your device, access your child’s profile via Family Sharing and select Content & Privacy Restrictions > Content Restrictions.
Step 2 – Scroll down to Game Center. Go through all options and choose from Don’t Allow, Allow with Friends Only and Allow with Everyone.
We recommend ‘Allow with Friends Only’ be enabled for teens and ‘Don’t Allow’ for younger children. As always, discuss your choice and the reasons behind it.

How to manage your child’s privacy
How to manage your child’s privacy
From location-sharing to making account changes, you can use Apple Family Sharing to enhance your child’s privacy while using their Apple device.
For older children, make sure you involve them in conversations around limits. Where necessary, work together to find a compromise. This will make pushback far less likely.
To manage your child’s privacy:
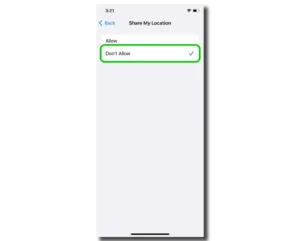
Step 1 – On your device, tap Family > your child’s name > Screen Time > Content & Privacy Restrictions.
Step 2 – Under Privacy, tap on Share My Location.
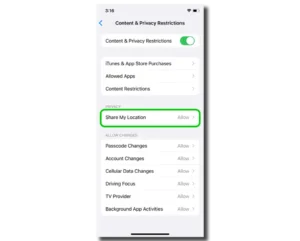
Step 3 – Select Don’t Allow. If you use an additional monitoring app which requires location-sharing, you might need to keep this turned on.
Step 4 – Go back and under Allow Changes, review each of the listed settings. Decide which permissions you want to give to your child (Allow) and which ones you want to stay in charge of (Don’t Allow).

Where to limit overspending
Where to limit overspending
Ask to Buy means that your child cannot make purchases in the app store on their iPhone or iPad without permission. This is a great way to limit accidental overspending along with restricting purchases across Apple platforms.
To turn on Ask to Buy:
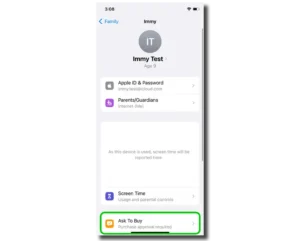
Step 1 – On your device, access the Settings > Family > Your child’s name > Ask to Buy.
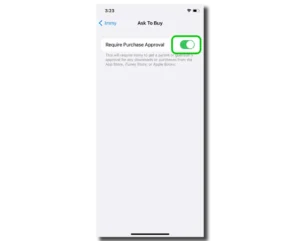
Step 2 – Tap the toggle next to Require Purchase Approval so it turns green.
To restrict purchases across Apple Platforms:
Step 1 – From the Screen Time menu, select Content & Privacy Restrictions.
Step 2 – Tap the toggle next to Content & Privacy Restrictions.

Step 3 – Tap on iTunes & App Store Purchases.

Step 4 – Go through Installing Apps, Deleting Apps and In-app Purchases and decide if you want to let your child do these things (Allow) or not (Don’t allow).

Step 5 – Under Require Password, decide if you want to restrict in-app purchases with a parental password.
We recommend turning on Always Require, particularly for younger children.

How to turn on Focus Mode
How to turn on Focus Mode
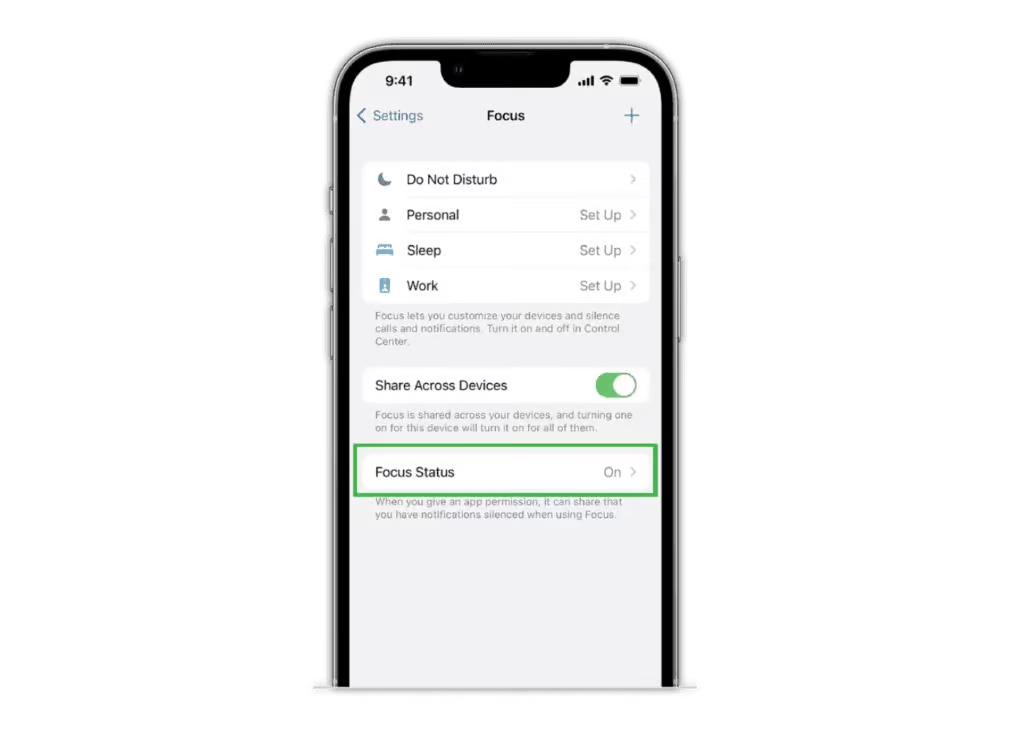
Step 1 – Go to Settings > Focus.
Step 2 – Tap a provided Focus option – such as Do Not Disturb, Personal, Sleep or Work – then tap Customise Focus.
Step 3 – Set up your Focus. You can select allowed or silenced notifications from people and apps, connect your Lock Screen or Home Screen, have this Focus turn on automatically, and add Focus filters.
How to set up iPhones and iPads for safety
- How to activate parental controls
- How to set Screen Time limits
- How to turn on Downtime
- Where to limit access to apps
- How to limit harmful contact
- How to limit harmful content
- How to restrict in-game communication
- How to manage your child’s privacy
- Where to limit overspending
- How to turn on Focus Mode
- More resources
View more guides
Discover more parental controls to manage children’s devices, apps and platforms for safer online experiences.