What you need to know
- Available on – iOS, Android
- Main features – Device-wide parental controls across Microsoft products, screen time management.
Quick advice
Microsoft Family Safety offers a suite of controls to allow you to manage your child’s online experience. Find 3 of the most useful controls below.
Set up a Family Group
Set up a family group and add your child to start managing their digital life.
Manage screen time
Help your child balance their screen time with time limits on apps and devices.
Limit spending
Set spending limits across the Microsoft Store and Xbox to help minimise overspending.
Video guide

How to set parental controls on Microsoft Family Safety
For Family Pairing, you will need your own TikTok account. Otherwise, you will need access to your teen’s TikTok account. It’s best to review these settings together.
Setting up a Family Group
Setting up a Family Group
To set up a family group, you must first sign into or create a Microsoft account. Once this is done, you can add your child to the group.
To set up a family group:
Step 1 – Open up Microsoft Family Safety in your browser or through the app. Then click Join Now in your browser, or Get Started on the app, to begin making your profile.

Step 2 – You will be prompted to sign into your Microsoft account. If you do not have an account, you can choose to create one from this screen.
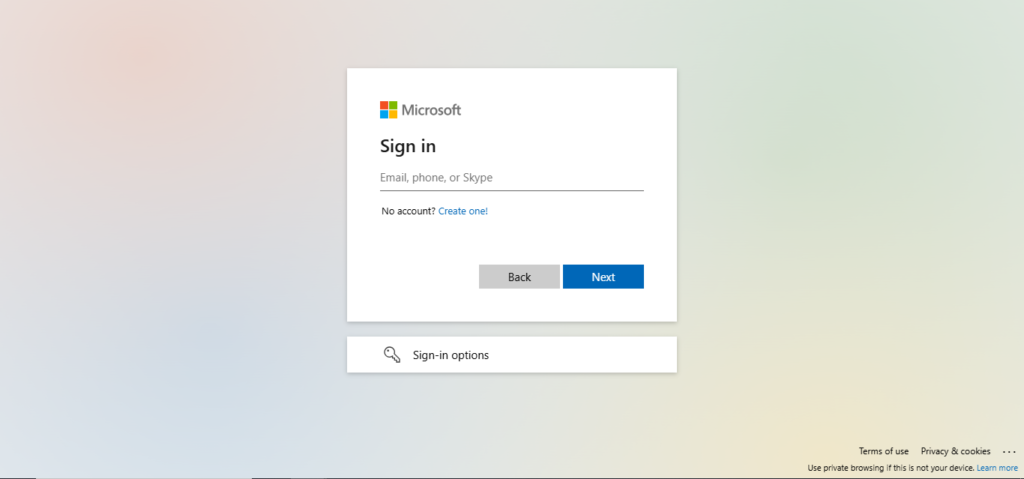
Step 3 – Once signed in, your family group will be created. You can now begin adding your children to the group.

How to add a child to the group
How to add a child to the group
Once you have logged in and created a group, you can begin adding child accounts. To do this, your child must have an email address and a Microsoft account. You can create these while adding the child to the group.
To add a child’s profile to your family group:
Step 1 – From your family group homepage, go to the top right corner of the page and click Add a family member.

Step 2 – Now decide whether you would like to add a member or an organizer. If you are adding a child, select member, while if you are adding a fellow parent/guardian you should choose organizer.

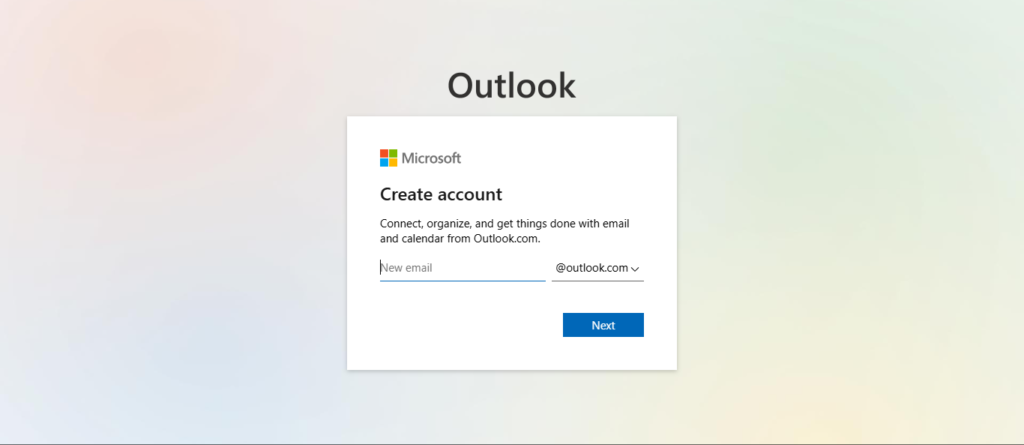
Step 3 – Once you have selected member, choose how to add your child to the group. You can invite them through their WhatsApp, phone number, or email. If your child does not have any of these, you can choose to create a Microsoft email account for them by clicking Create an account.

Step 4 – If you choose to create an account, you will be taken to Outlook account creation, where you will have to set an email address and password. If this is your child’s first email address, make sure they understand that they should not share their account information with people online.
Step 5 – After creating an email address and password and completing a quick test to prove you are human, you must provide parental consent for your child to have a Microsoft account. This involves typing your name at the bottom of a terms and conditions form. Reading through the form will let you know the information and data Microsoft will collect about your child.

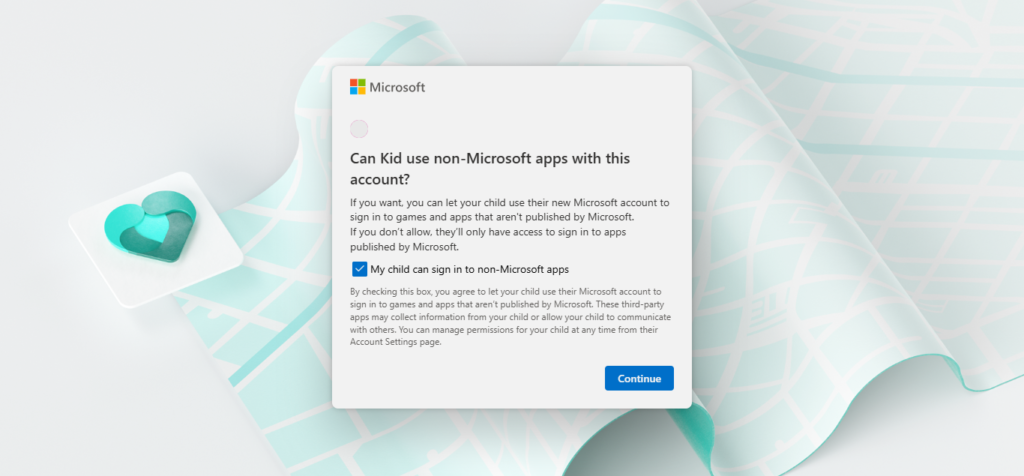
Step 6 – You can also choose whether or not to allow children to sign in to non-Microsoft apps and games using their Microsoft account. If you want to let your child use non-Microsoft apps, check the box.
Step 7 – Your child’s account is now created and a part of your family group. Click Family Safety to be taken to the Family Safety homepage, where you can begin setting controls.

Choosing child account settings
Choosing child account settings
When you first go onto the Family Safety homepage after adding a child to the family group, you will be asked to apply settings for them. You can change these settings at a any time in the future by clicking the gear icon at the top of the homepage.
These settings include:
- Age rating – This is the age limit which will filter out content designed for users above the age limit.
- Web safety – Toggling this option on will block unsafe browsers and mature content from the device.
- Ask to buy – Your permission will be required for any purchases your child wants to make.
- Weekly email – A report will be sent to you every week with details on your child’s digital activity.
- Child’s activity – By toggling this on, you can also have your child’s activity sent to you by email.

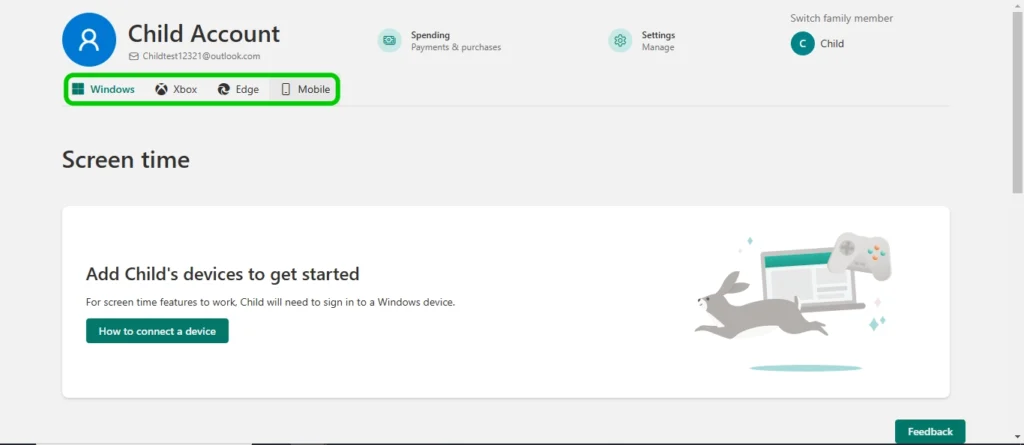
Connecting devices
Connecting devices
You can connect your child’s devices to Microsoft Family Safety, allowing you to set screen time limits and view your child’s activity.
To connect a device:
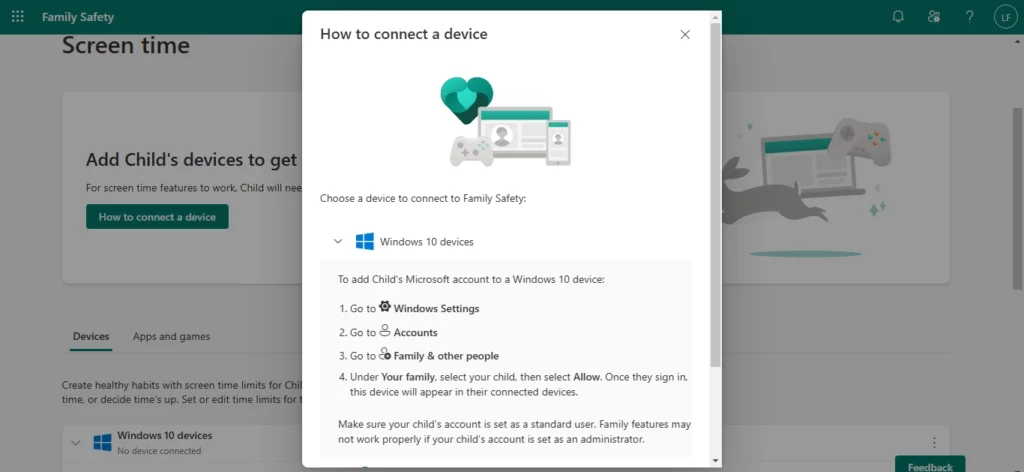
Step 1 – From your child’s profile, click the How to connect a device button, under the Screen Time section.

Step 2 – Here you will have the choice of multiple devices, including Windows 10 devices, Xbox, Androids and iPhones, and clicking on them will give you step-by-step instructions on how to connect them to Microsoft Family Safety.
Once these devices are connected, you can begin setting screen time limits and tracking their activity.
Setting screen time limits
Setting screen time limits
The ability to set screen time limits on your child’s device is one of the key features of Family Safety. The way in which limits are applied varies based on the device that the limit is being set on.
To set a screen time limit on Windows 10 & Xbox:
Step 1 – From your child’s profile page, click on the device which you wish to set screen time limits on.

Step 2 – On the device page, click Turn limits on.

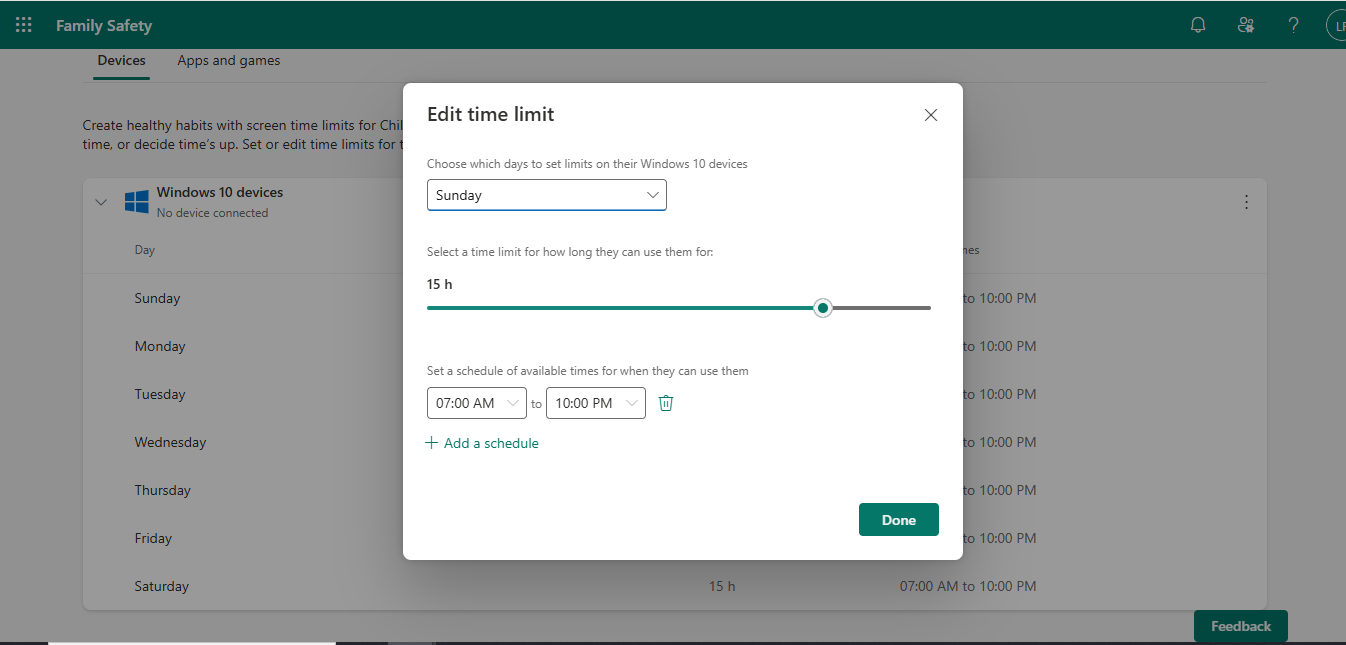
Step 3 – Now you can begin editing the time limits. Select a day to start changing the screen time allowance.
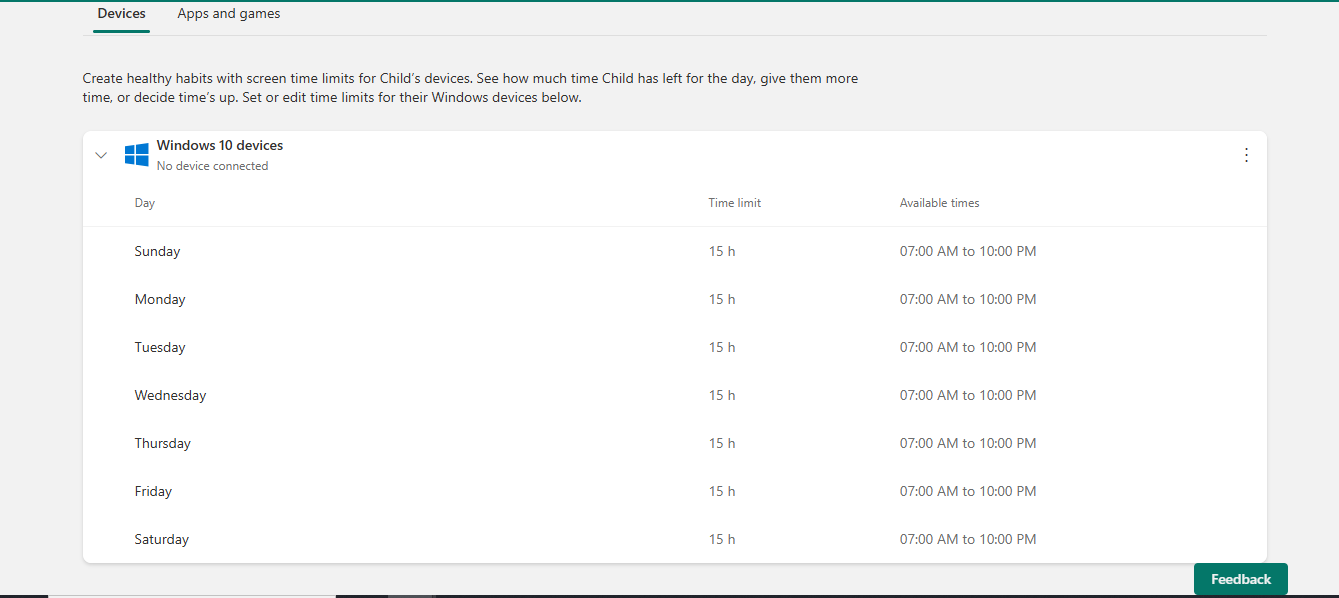
Step 4 – Here you can select which days the limit applies to, use a slider to decide the total hours your child can use the device for each day, and set schedules of available times that your child can play, for example stopping them from using the device close to bedtime.
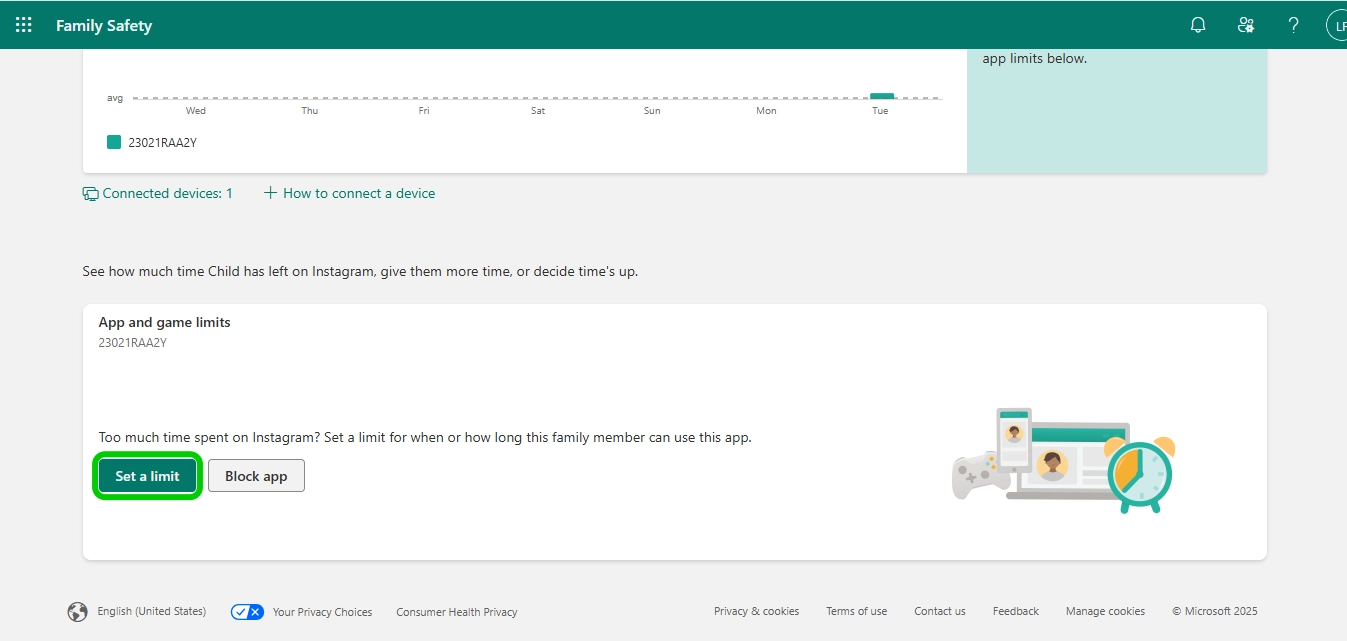
To set screen time limits on mobile:
Unlike Windows and Xbox, screen time limits can not be set on the mobile device itself. However, limits can be set on the apps that your child uses on their mobile.
Step 1 – From your child’s profile page, select Mobile.

Step 2 – Scroll down to the apps and games section, and select the app you would like to set time limits on.

Step 3 – To set time limits on the app, click Set a limit. You can also block the app altogether if you want your child spending no time on it. To do this, click Block app. You can unblock it at any time.
Step 4 – Now you can edit your child’s screen time allowance on this app. The options available are similar to the controls allowed on Windows and Xbox, with the ability to select which days the limit applies to, use a slider to decide the total hours your child can use the app each day, and set schedules of available times that your child can play.

Microsoft Edge controls
Microsoft Edge controls
Settings can be applied to manage your child’s experience when using Microsoft Edge, Microsoft’s own browser.
To change the controls on your child’s browser:
Step 1 – From your child’s profile page, select Microsoft Edge.

Step 2 – You are now on the Microsoft Edge controls page. At the top, you can see your child’s activity on Microsoft Edge, including websites they visit and terms they search. This will only work if you ensure that your child uses the Microsoft Edge browser.

Step 3 – If you scroll down further, you will come to the Filter Settings. This section has various filter options:
Filter inappropriate websites and searches – Toggling this on will prevent your child from viewing mature content on Microsoft Edge. It will also block any other browsers from being used, to ensure they must use Edge.
Only use allowed websites – Turning this setting on will mean your child can only access sites that you have specificially marked as allowed. Every other website will be blocked. This is a good option for younger children who are not quite ready to surf the entire internet yet.
Blocked sites – Typing a website address into this box and clicking the plus sign will make it so your child can’t access the site. You can unblock a site at any time.
Allowed sites – This setting is only needed if you choose to turn on the Only use allowed websites control. Like with blocked sites, typing a website address into the box and clicking the plus sign will make it so your child can access the site.

Turning on activity reporting
Turning on activity reporting
Activity reporting is switched on for all devices by default. This setting can be switched off and on for each device independently.
To change activity reporting settings:
Step 1 – From your child’s profile page, click on the device that you want to change the reporting setting for.
Step 2 – Scroll down to the bottom of the device’s page, where you will find a section with an Activity reporting toggle. Toggle it on if you would like to see your child’s activity on the device, or off if you do not want to see this information.

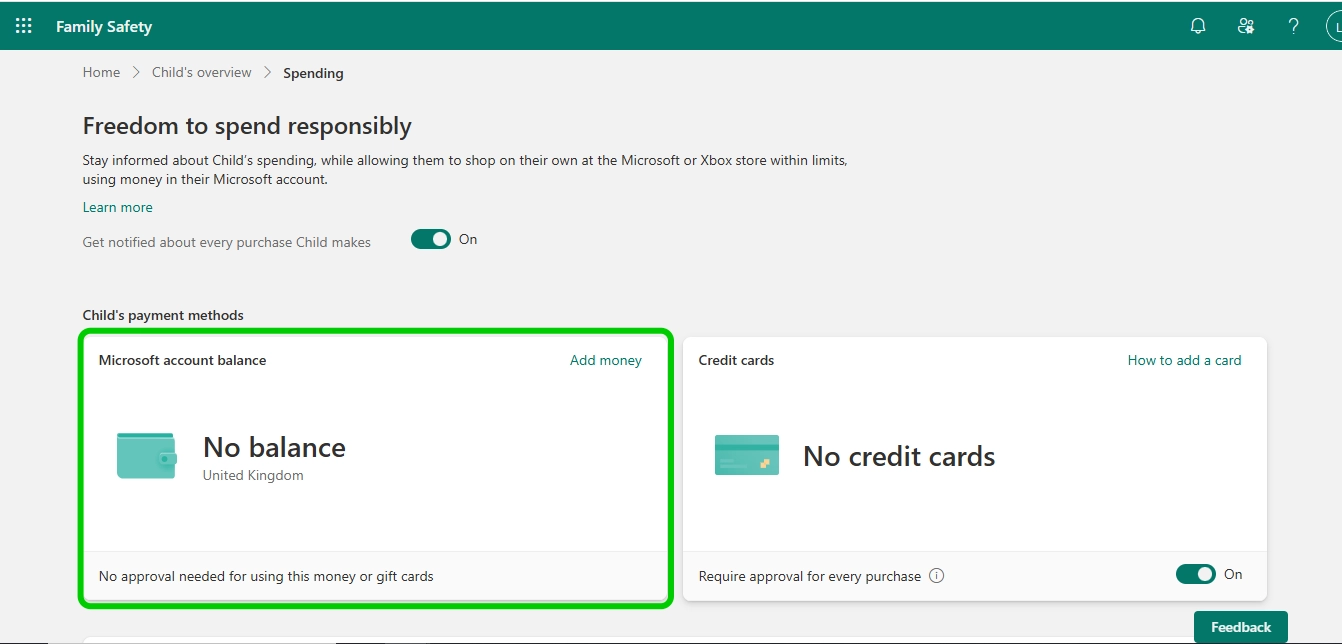
Managing spending
Managing spending
You can control how your child spends money in the Microsoft and Xbox store by giving them a prepaid balance or having them require parental approval before each purchase. You can also stay informed about every purchase they make with activity reporting.
To manage your child’s spending:
Step 1 – From your child’s profile page, go to the Spending tab.

Step 2 – You are now in the spending hub. At the top of the page, there is a toggle. Turn this on if you want to be notified whenever your child makes a purchase.

Step 3 – Using Family Safety, you can top up your child’s Microsoft account balance. Doing this will allow your child to shop freely, without any risk of them spending more than you want them to. To top up the balance, simply click add money in the top corner of the Microsoft account balance widget.
Step 4 – You can top up the balance with £10, £15, £25 or £50. Please note that this money can not be withdrawn from the Microsoft account after it is deposited.

Step 5 – A credit card can be added to the account so that money only needs to be sent to the account when a purchase is being made. To keep control over your child’s spending when using a credit card, toggle on the require approval before every purchase setting, so that your child can’t make purchases without your permission.

Step 5 – Spending activity can be viewed at the bottom of the page, so that you can see everything your child has purchased over the last 90 days. This allows you to keep track of how much they’re spending and make sure they’re not purchasing inappropriate apps and items.

How to set parental controls on Microsoft Family Safety
View more guides
Discover more parental controls to manage children’s devices, apps and platforms for safer online experiences.