Quick advice
Set up Roblox parental controls to keep your child safe while they game.
Set content restrictions
Customise the automatic content restrictions for under-13s to help curate games and experiences for their interests and maturity.
Manage chat settings
Customise communication settings so that only your child’s friends can contact them. You can also set quick language filters.
Manage spending
Set monthly spending restrictions in Roblox and receive spend notifications to avoid accidental overspending in games.
Video guide
The top 3 parental controls to set on Roblox
 Close video
How to set Roblox parental controls
The following steps were recreated using an Android device. While the steps work across other devices, you might notice some visual differences from the screenshots below.
You will need access to your child’s account for Roblox and the system they play on.
How to set up a parent account
How to set up a parent account
To use Roblox parental controls, you must set up a parent account. You can then link your child’s account to yours for access to a range of settings and insights.
To create a parent account:
Step 1 – If you already have a Roblox account, great! If not, you can register here. In the Roblox app (Android, iOS), tap More > Settings > Account Info.

Step 2 – Under Email Address, add your parent email. This is the same email you’ll need to enter to connect your child’s account to yours. Check your email to verify your account.
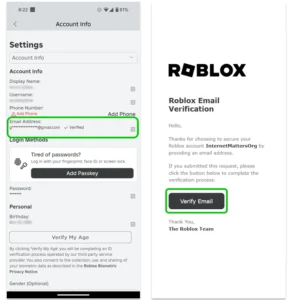
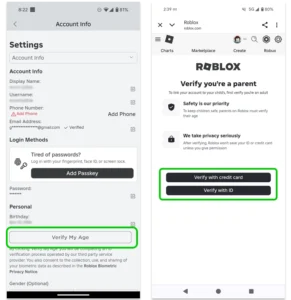
Step 3 – Under Birthday, tap Verify My Age. Choose either the credit card route or the photo ID route.
Follow the instructions on screen to complete the process, which should only take a minute or two.
You can learn how age checks protect your privacy with this guide.
Your Roblox parent account is now ready to link to your child’s for use of parental controls.
Linking your account to your child’s
Linking your account to your child’s
If your child is under the age of 13, you can set parental controls across their account. To do this, you must link your Roblox parent account to your child’s account.
To link to your child’s account:
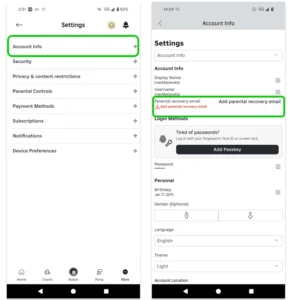
Step 1 – On your child’s account, tap on More > Settings > Account Info. Tap Add parental recovery email.
Enter the email you use for your own Roblox account. Check your email to confirm.
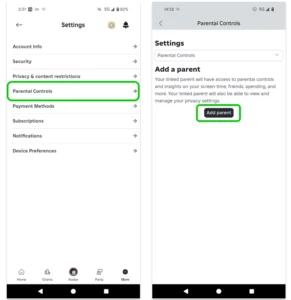
Step 2 – Return to the Settings menu on your child’s Roblox account. Tap Parental Controls > Add Parent. Enter your email.
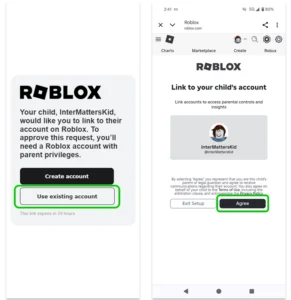
Step 3 – Check your email to confirm the link. If you still don’t have an account, select Create account. Otherwise, select Use existing account and login. Then, tap Agree.
Note: If you have not verified your age, you will be asked to do so before you can link to your child’s account.
Otherwise, you can return to your Roblox account to customise parental controls for your child.
How to manage screen time on Roblox
How to manage screen time on Roblox
Roblox has a lot of fun games and experiences that children enjoy. Unfortunately, children can struggle to switch off and take breaks, so Roblox has in-built screen time controls parents can use.
To set screen time limits:
Step 1 – When logged into your parent account in the Roblox app, tap More > Settings > Parental Controls. Next to Screen time, tap Manage.
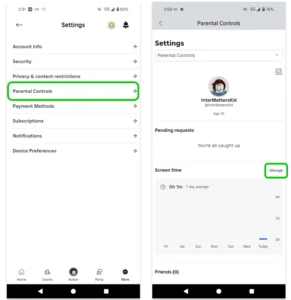
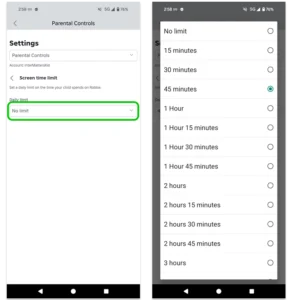
Step 2 – Tap Screen time limit. Under Daily limit, tap the dropdown box and choose a limit.
There are a range of options from 15 minutes to over 3 hours. Choose the maximum amount of time you want to allow each day. We recommend limiting it to 1 hour at most to encourage balance with other activities both online and offline.
Under Screen time, you can also view Top experiences to see which games your child plays the most on Roblox. This is a great tool to help you talk with them about their online life.
Where can you set content restrictions?
Where can you set content restrictions?
With Roblox parental controls, you can set maturity levels and block specific experiences within those levels.
To set maturtiy levels:
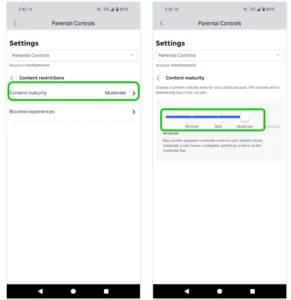
Step 1 – Under More > Settings > Parental controls, scroll down and tap Content restrictions.

Step 2 – Tap Content maturity. Set your child’s Content maturity level, choosing between Minimal, Mild and Moderate. You cannot choose Restricted for under-13s because certain content is already restricted for this age group.
- Minimal: Choose this if you’re okay with your child seeing occasional mild violence, light unrealistic blood or elements which could cause mild fear.
- Mild: Choose this if you’re okay with your child seeing more repeated mild violence, heavy unrealistic blood or repeated elements which could cause mild fear.
- Moderate: Choose this if you’re okay with your child seeing content which is more violent, blood which is more realistic, crude humour, content which suggests gambling (unplayable) or content which could cause more fear.
Minimal is the best option for younger children or those who might struggle to process content which is violent, bloody or scary even if it’s not realistic.
To block specific experiences:
Step 1 – From the Content restrictions screen, tap Blocked experiences. Next to Blocked experiences, tap the + symbol.

Step 2 – Search for the full experience title or a keyword within the title. When you see the correct experience, tap Block beneath the image. Tap Block again to confirm.

Your child will still be able to click on the experience to learn about it, but they won’t have an option to play. Once you feel they’re old enough, you can unblock the experience.
Manage communication settings
Manage communication settings
To help minimise contact from harmful strangers, you can customise who your child can communicate with by using Roblox parental controls.
To manage chats within experiences:
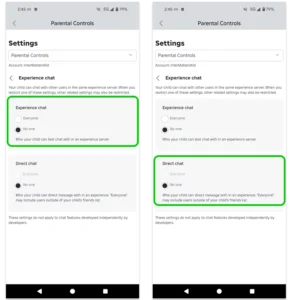
Step 1 – From your parent account, go to the Parental controls menu > Communication. Tap Experience chat.

Step 2 – Under Experience chat, choose who your child can publicly text chat with. Choose from Everyone or No one.
Under Direct chat, choose who can send your child a direct message in Roblox experiences. Choose from Everyone or No one. Note that if you chose ‘No one’ for Experience chat, Direct chat will automatically be No one as well.
To manage Party communication:
From the Communication menu, tap Party.
Under Party, select who your child can form a Party (up to 2 members) with. Parties are groups which can join experiences together. For children under 13, this is limited to Friends or No one.
Under Group Party, choose who can add your child to a Group Party (up to 6 members). Again, you can choose between Friends or No one.
Only select Friends if you are across who is in your child’s Friends list.

How to set spending restrictions
How to set spending restrictions
Some experiences on Roblox encourage in-game spending. Outside of experiences, there are also various items users can buy for their avatar using Robux. Robux costs real currency, which you can learn about here.
To limit spending on Roblox:
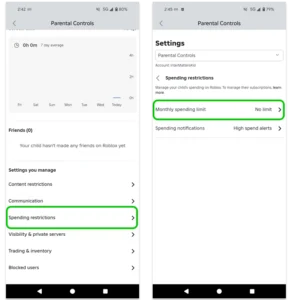
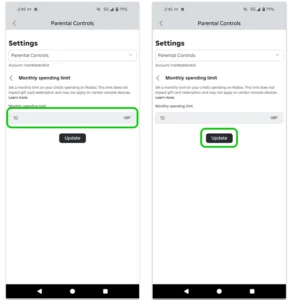
Step 1 – Navigate to the Parental Controls menu. Scroll down and tap Spending restrictions. Tap Monthly spending limit.
Step 2 – Enter the amount you’re happy with your child spending on a monthly basis. Tap Update.
If you do not have a credit card set up on their account, they will not be able to spend anything. This limit also does not apply to gift cards.
Note that while the number you enter will save, it might take a few moments to show as updated.
Step 3 – Go back and tap Spending notifications. Choose when you’d like to get notifications about your child spending on Roblox.
- All transactions: Receive notifications whenever your child buys anything on Roblox to keep track of their spending.
- High spend alerts: On by default, this will only notify you if your child spends £100, £250 or £500 in a given month. The likelihood of this happening is greatly reduced by setting a monthly limit.
- None: You will not receive any notifications about your child’s in-game spends but might still receive notifications from your credit card company or payment processor.
We recommend tracking all transactions, particularly if you don’t have spending limits in place.

How to support your child’s security
How to support your child’s security
There are a range of ways to enhance your child’s privacy and security on Roblox. Doing these steps can help reduce the chance of them being targeted by people hoping to do them harm.
To protect your child’s Roblox account:
Step 1 – In the Roblox Parental controls menu, tap Visibility & private servers > Visibility.
Choose who can see your child’s Online status (Friends or No one).
Then, under Show current experience, select who can see which experience/game your child is currently in on Roblox (Friends or No one).
Unless you personally know the users in their Friends list (such as friends from school), you might want to keep this set to No one.

Step 2 – Go back and tap Private servers. Choose from Friends and No one to say who can join your child’s private servers and which private servers they can join.

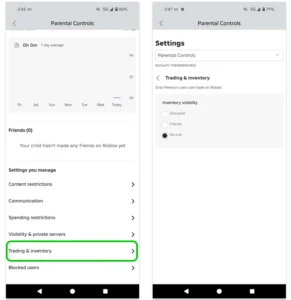
Step 3 – Go back to the main Parental controls menu and tap Trading & inventory. Here, you can manage who your child can trade with (Premium only) and who can see their inventory.
We recommend limiting this to Friends or No one.
If a stranger can see your child’s inventory and notices there’s an item they want, they might try to manipulate your child to give it to them. That could include convincing your child to give them access to their account.
Step 4 – From your child’s Roblox account, tap More > Settings > Security. Set up 2-Step Verification. You can choose from:
- Authenticator App: Google, Microsoft and similar companies have authenticator apps which you can download to your or your child’s device. Your child will need to enter a code from the authenticator app each time they login.
- Email: Your child will need to access their email to find and enter a temporary code for when they login.
- Hardware Security Keys: An external item which works like an authenticator app but must be connected to the device your child is trying to login to. This choice is a little more difficult unless you already have a hardware security key.
Tap the toggle next to your choice and follow the instructions to set it up. This will help keep your child’s a little more secure, especially if someone else gets access to their password.

Create a private server
Create a private server
Private servers let children play games only with trusted friends they invite, instead of joining public servers with random players. This reduces the risk of interacting with strangers on Roblox.
To set up a private server:
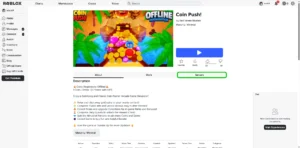
Step 1 – From the Roblox homepage, select the game you wish to create a private server for.

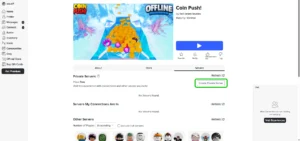
Step 2 – On the page of the game you wish to create a private server for, select Servers.
Step 3 – Click Create Private Server.
Step 4 – Enter a server name and then select Buy Now.
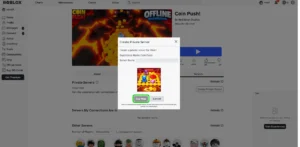
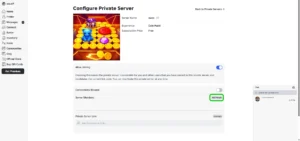
Step 5 – Select Customize.
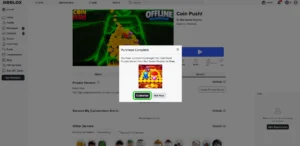
Step 6 – On the Configure Private Server page, select Add People.
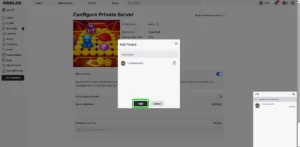
Step 7 – Search the name of the person you wish to invite.
Step 8 – Select the account you wish to invite, then click Add.
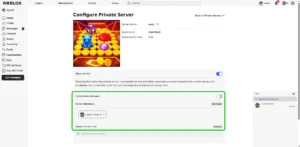
Step 9 – The account will now be added to the server. You can view all invited members in the Server Members section.
Where to find reporting and blocking tools
Where to find reporting and blocking tools
Roblox encourages users to block and report users who break rules or make experiences less enjoyable. In addition to blocking specific experiences for your child, your child can use these tools while they play.
Familiarise yourself with how to block and report so that you can show your child to help them take action.
- Block your child’s friends with Parental Controls
- Block a user during a game
- Report a user during a game
- Block or report a user outside of a game
- Report illegal content
To block or report a friend on your child’s account:
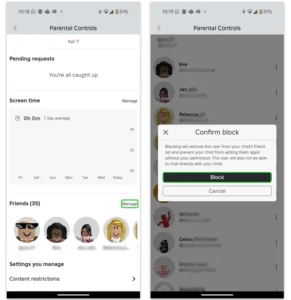
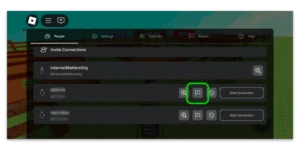
From the Parental Controls menu in your Roblox app, scroll to your child’s friends and tap Manage.
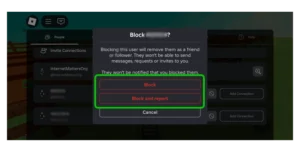
Tap the 3 dots next to the friend. Tap Block or Report and follow the instructions.
To block users during a game:
Step 1 – Tap on the Roblox icon in the top left corner. Scroll to find the user’s name and then tap the block icon (a circle with a line through it).

Step 2 – Tap Block.
If your child needs to also report rule-breaking, the should click Block and report. You can then follow the next steps for reporting.
To report a user during a game:
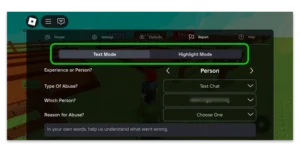
Step 1 – From the same menu you would open to block a user, find the right person and tap the flag next to their name.
Step 2 – Choose from Text Mode or Highlight Mode.
- Text Mode: Your child chooses and types information about the reason for their report.
- Highlight Mode: Your child places up to 5 blue circles in the experience to show what they’re reporting. They then choose from a list of options to complete the report. They can use this to report content as well.
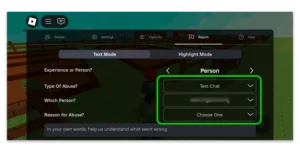
Step 3a – In Text Mode, select the Type of Abuse (chat or avatar) and the Reason for Abuse (what your child is reporting the user for).
In the space below, type out more information about the abuse and why they’re reporting the user. Tap Submit.
Step 3b – In Highlight Mode, tap Enter Highlight Mode. Place the blue circles (up to 5) over the examples that you’re reporting.
Answer what was wrong, where it happened and anything else to help make the report effective. Then tap Submit.

To block or report a user outside a game:
Step 1 – Open up the user’s profile. You can do this by searching for their name or, if they’re in your child’s Friends list, finding them there. Tap the 3 dots in the bottom left corner. Tap Report or Block.

Step 2 – If reporting the user, follow the instructions to give Roblox more information about why you’re reporting them.
If blocking the user, tap Block (or Block and report if you want to report them as well). To unblock then, tap the black Unblock button at the bottom.
If the user was your child’s friend and they wish to have them on their list still, they will need to send a new friend request.

In the unlikely event that your child comes across illegal content:
When reporting a user, scroll to the bottom of the screen. Tap the link that says You can also report illegal content under the UK Online Safety Act (UK only).
This will open in a browser. Read through the information and scroll down to the form. Fully fill out your contact information, including your parent email rather than your child’s email. Answer the questions and then tap Submit.

How to monitor your teen’s safety
How to monitor your teen’s safety
Parents can support their teen’s safety on Roblox with some parental control features to manage screen time and in-game spending.
To start monitoring your teen’s time on Roblox, first follow these steps to link your account to theirs.
You’ll then be able to review their top experiences, which can help you have conversations around their digital life.
You can also set up spending alerts so you stay on top of their spending.
Verify your child’s age
Verify your child’s age
When your child opens Roblox, they will be asked to verify their age. Through facial estimation, Roblox can sort users into age groups, meaning they will only be able to interact with users of similar ages.
To verify your child’s age:
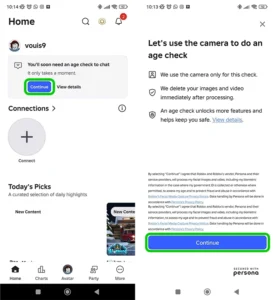
Step 1 – Open your child’s Roblox app and click Continue in the age check popup.
Step 2 – On the next page, select Continue.
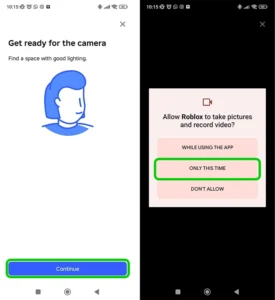
Step 3 – Click Continue.
Step 4 – Give Roblox permission to use the camera.
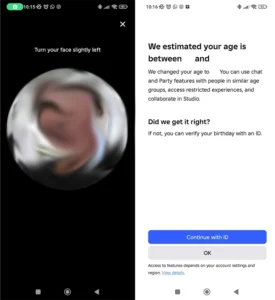
Step 5 – Have your child follow the instructions on the screen to complete facial estimation.
Step 6 – You will receive the estimated age group. If this is wrong, select Continue with ID to give proof of your child’s real age. If it is correct, select Continue.
Your child’s age is now verified, and they will only be able to interact with users within the same age group.
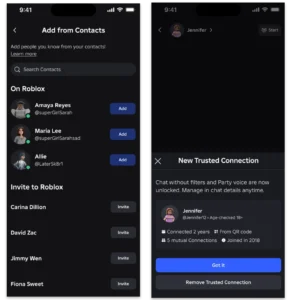
Help your teen build trusted connections
Help your teen build trusted connections
While parental controls support under-13s, teens have their own tools to keep themselves safe. Trusted Connections offer greater communication options that might be restricted with normal interactions.
To set up Trusted Connections:
Step 1 – On your teen’s account (with your teen), go to More > Settings > Account Info. Tap Verify My Age and follow the verification instructions.
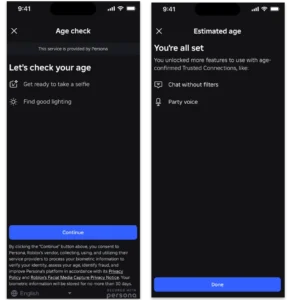
Step 2 – Age-checked users that your teen adds through a QR code or from their Contacts list will become a Trusted Connection. Your child can review this via their Friends list.
How to set Roblox parental controls
- How to set up a parent account
- Linking your account to your child’s
- How to manage screen time on Roblox
- Where can you set content restrictions?
- Manage communication settings
- How to set spending restrictions
- How to support your child’s security
- Create a private server
- Where to find reporting and blocking tools
- How to monitor your teen’s safety
- Verify your child’s age
- Help your teen build trusted connections
- More resources
View more guides
Discover more parental controls to manage children’s devices, apps and platforms for safer online experiences.