Quick advice
Set up Roblox parental controls to keep your child safe while they game.
Set age restrictions
Quickly set content restrictions with Allowed Experiences, which will limit the content your child can see based on their age.
Manage chat settings
Customise communication settings so that only your child’s friends can contact them. You can also set quick language filters.
Manage spending
Set monthly spending restrictions in Roblox and receive spend notifications to avoid accidental overspending in games.
Video guide
 Close video
How to set Roblox parental controls
The following steps were recreated using an Android device. While the steps work across other devices, you might notice some visual differences from the screenshots below.
You will need access to your child’s account for Roblox and the system they play on.
How to set up a parent account
How to set up a parent account
To use Roblox parental controls, you must set up a parent account. You can then link your child’s account to yours for access to a range of settings and insights.
To create a parent account:
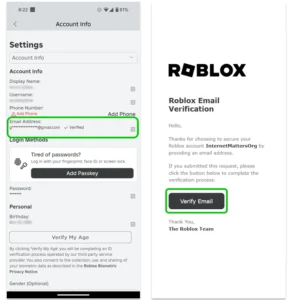
Step 1 – If you already have a Roblox account, great! If not, you can register here. In the Roblox app (Android, iOS), tap More > Settings > Account Info.

Step 2 – Under Email Address, add your parent email. This is the same email you’ll need to enter to connect your child’s account to yours. Check your email to verify your account.
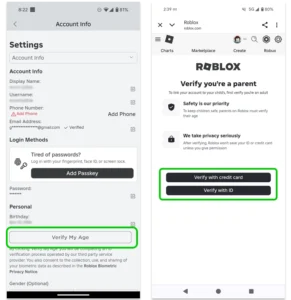
Step 3 – Under Birthday, tap Verify My Age. Choose either the credit card route or the photo ID route.
Follow the instructions on screen to complete the process, which should only take a minute or two.
You can learn how age checks protect your privacy with this guide.
Your Roblox parent account is now ready to link to your child’s for use of parental controls.
Linking your account to your child’s
Linking your account to your child’s
If your child is under the age of 13, you can set parental controls across their account. To do this, you must link your Roblox parent account to your child’s account.
To link to your child’s account:
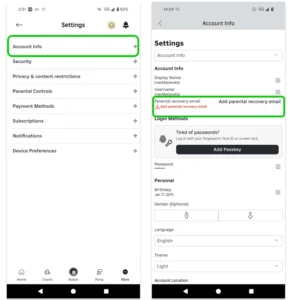
Step 1 – On your child’s account, tap on More > Settings > Account Info. Tap Add parental recovery email.
Enter the email you use for your own Roblox account. Check your email to confirm.
Step 2 – Return to the Settings menu on your child’s Roblox account. Tap Parental Controls > Add Parent. Enter your email.
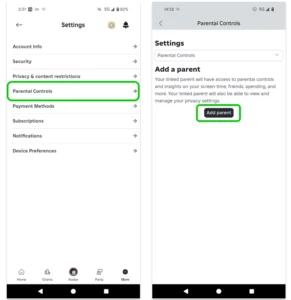
Step 3 – Check your email to confirm the link. If you still don’t have an account, select Create account. Otherwise, select Use existing account and login. Then, tap Agree.
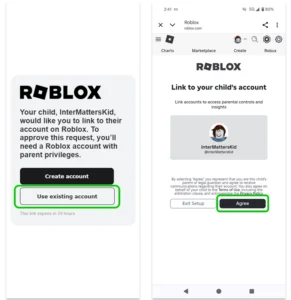
Note: If you have not verified your age, you will be asked to do so before you can link to your child’s account.
Otherwise, you can return to your Roblox account to customise parental controls for your child.
How to manage screen time on Roblox
How to manage screen time on Roblox
Roblox has a lot of fun games and experiences that children enjoy. Unfortunately, children can struggle to switch off and take breaks, so Roblox has in-built screen time controls parents can use.
To set screen time limits:
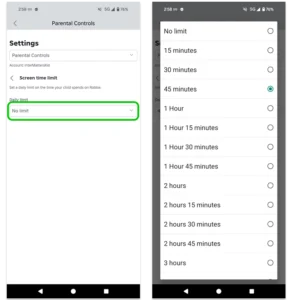
Step 1 – When logged into your parent account in the Roblox app, tap More > Settings > Parental Controls. Next to Screen time, tap Manage.
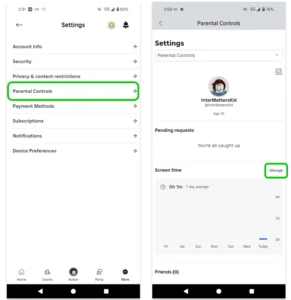
Step 2 – Tap Screen time limit. Under Daily limit, tap the dropdown box and choose a limit.
There are a range of options from 15 minutes to over 3 hours. Choose the maximum amount of time you want to allow each day. We recommend limiting it to 1 hour at most to encourage balance with other activities both online and offline.
Under Screen time, you can also view Top experiences to see which games your child plays the most on Roblox. This is a great tool to help you talk with them about their online life.
How to set Content Maturity level
How to set Content Maturity level
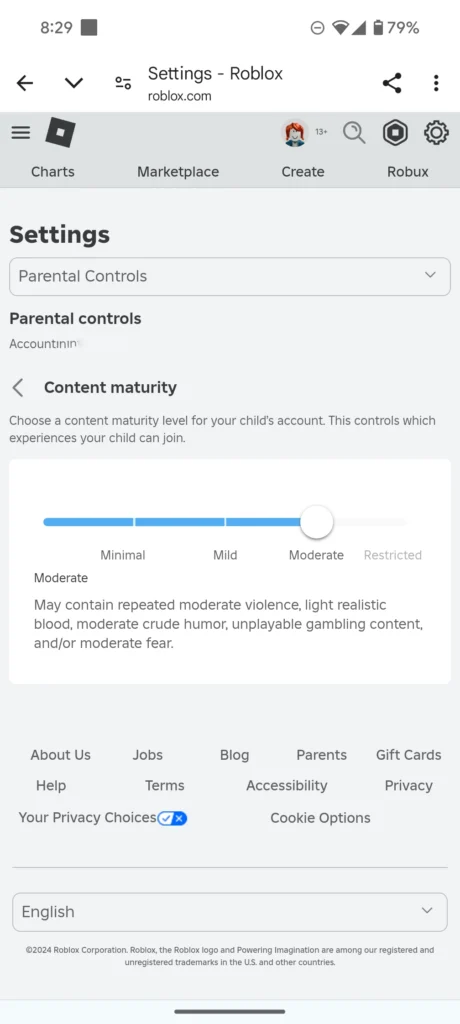
Now that you’ve linked your account to your child’s, you can set controls. Content Maturity level is the setting that controls the level of mature content your child can see while playing, such as blood, violence and crude humour.
To set Content Maturity Level:
Step 1 – From Settings > Parental Controls, click Content maturity.

Step 2 – Slide the bar to the level of mature content you want your child to be able to view while playing.
Younger children should be kept to the lower end of the bar, with options like Minimal or Mild, while older children and teens might be able to use a moderate maturity level.
Blocking specific experiences
Blocking specific experiences
If parents want more control over the experiences their child can access on Roblox, they can use experience-level blocking. For example, if a parent wants their child to have a Moderate content maturity level but not access a specific experience that appears in the Moderate category, they can use this feature.
To block specific experiences:
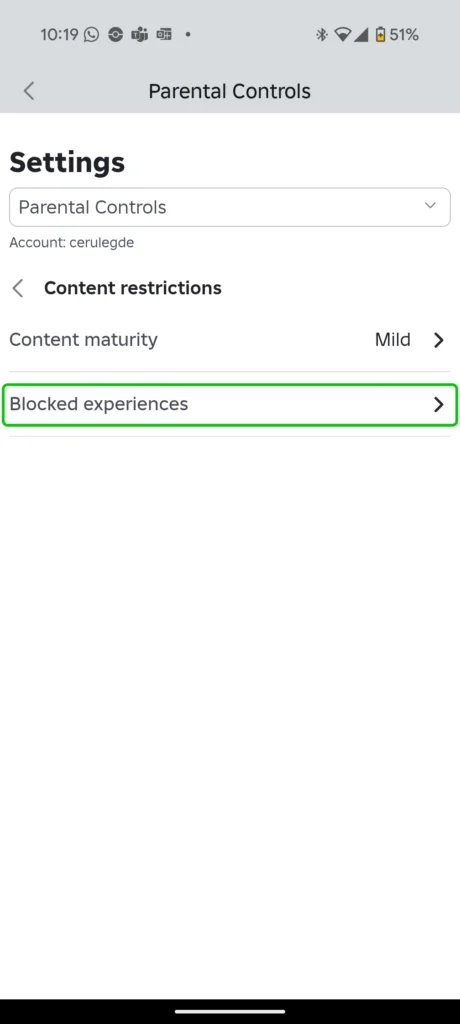
Step 1 – On the Parental Controls menu, select Content Restrictions.

Step 2 – In the Content restrictions menu, click Blocked experiences.
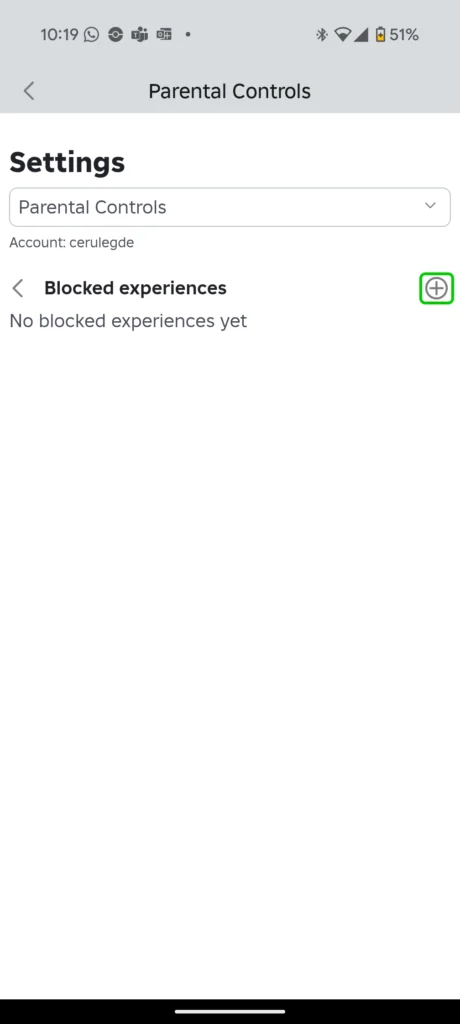
Step 3 – In the Blocked experiences menu, click the plus icon to block an experience.
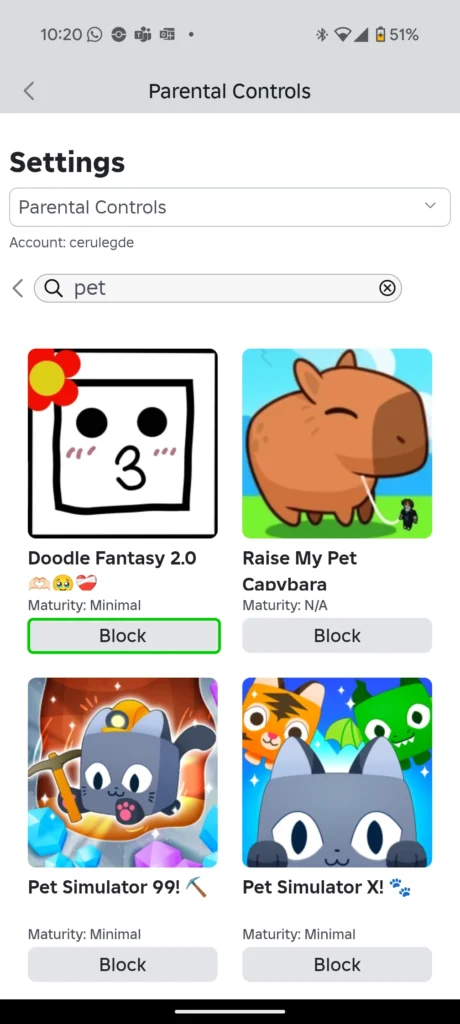
Step 4 – Type the name of the experience you would like to block in the search bar, then scroll down to the experience you would like to block and click block.
You can view the content’s maturity level underneath the experience’s title.
Where can I manage communication settings?
Where can I manage communication settings?
You can customise who your child communicates with on Roblox through privacy settings. This can help you ensure they only communicate with Friends and that strangers cannot directly message them.
To manage communication settings:
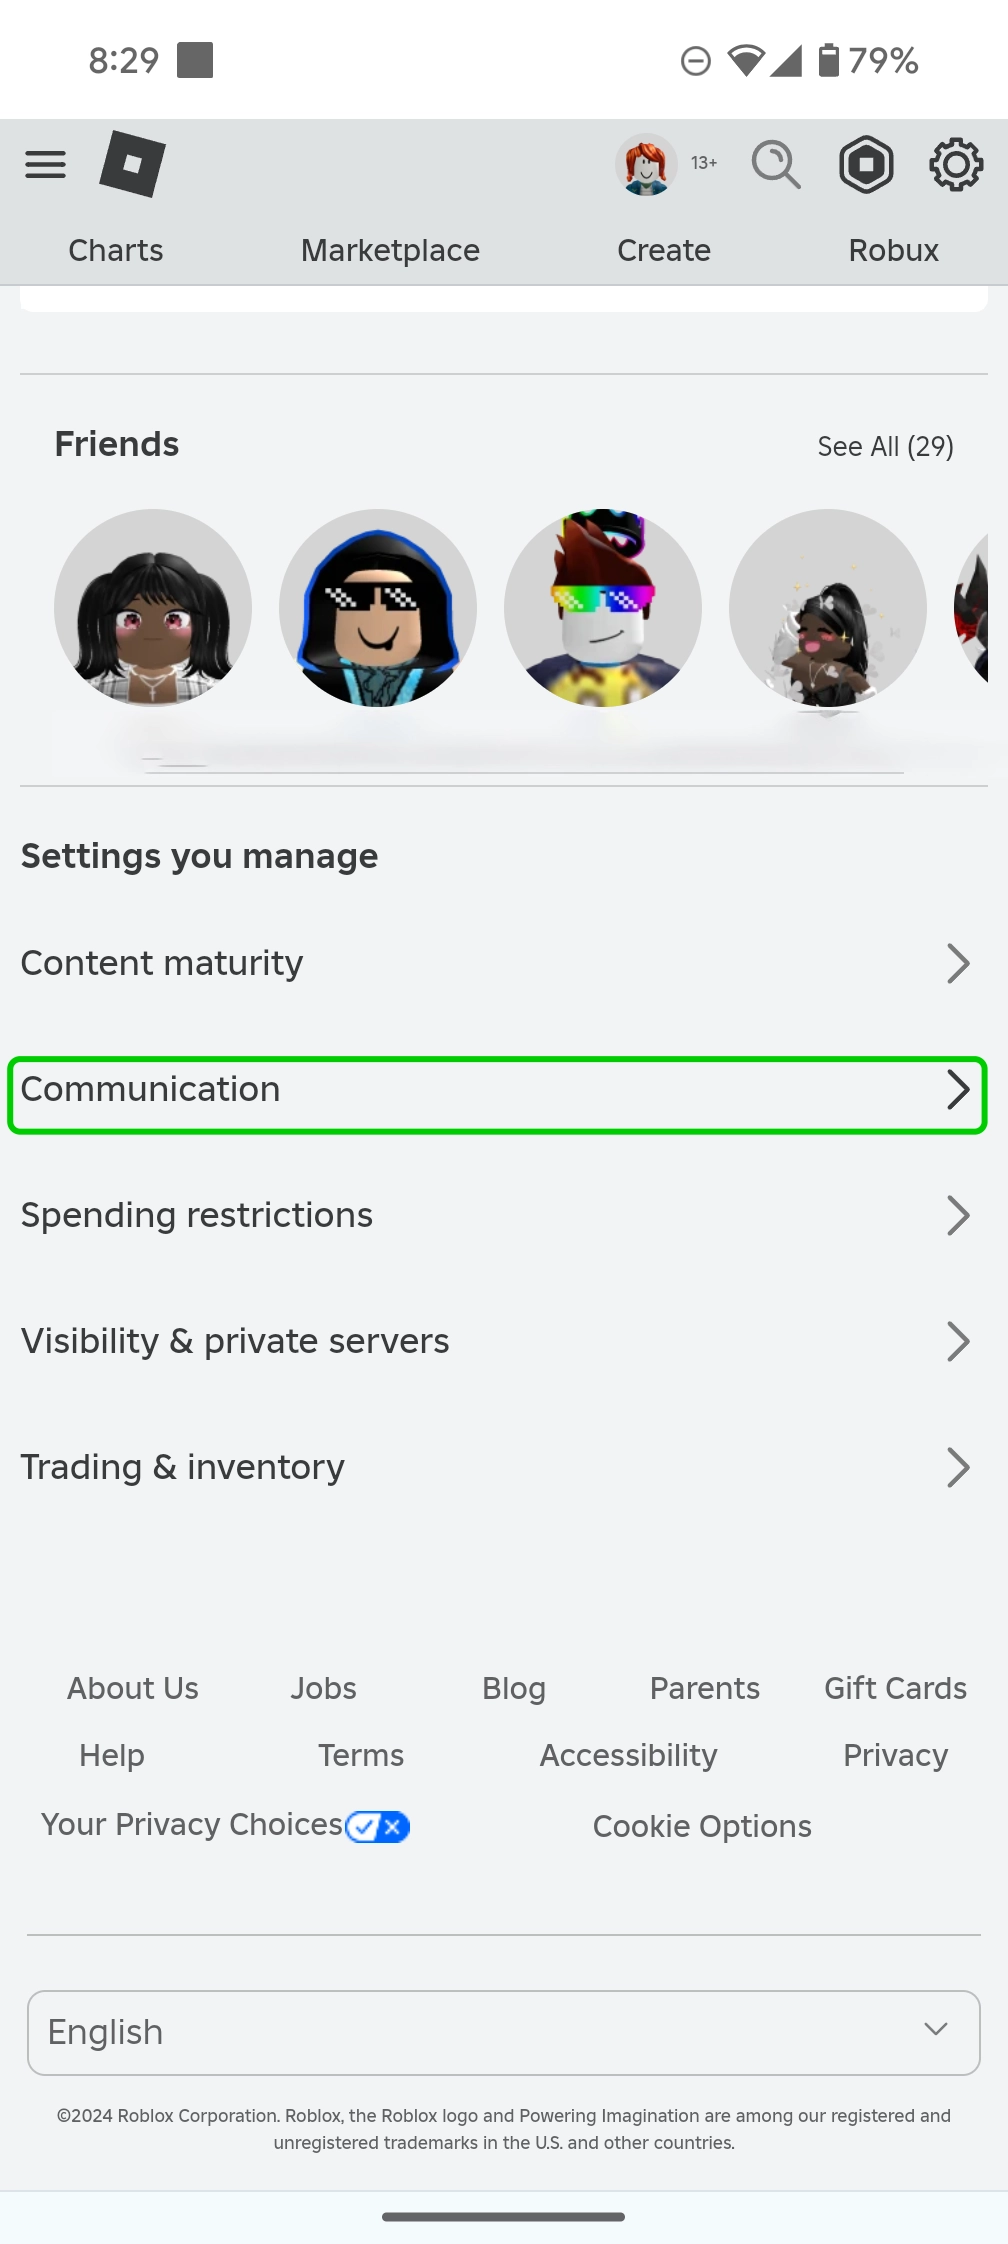
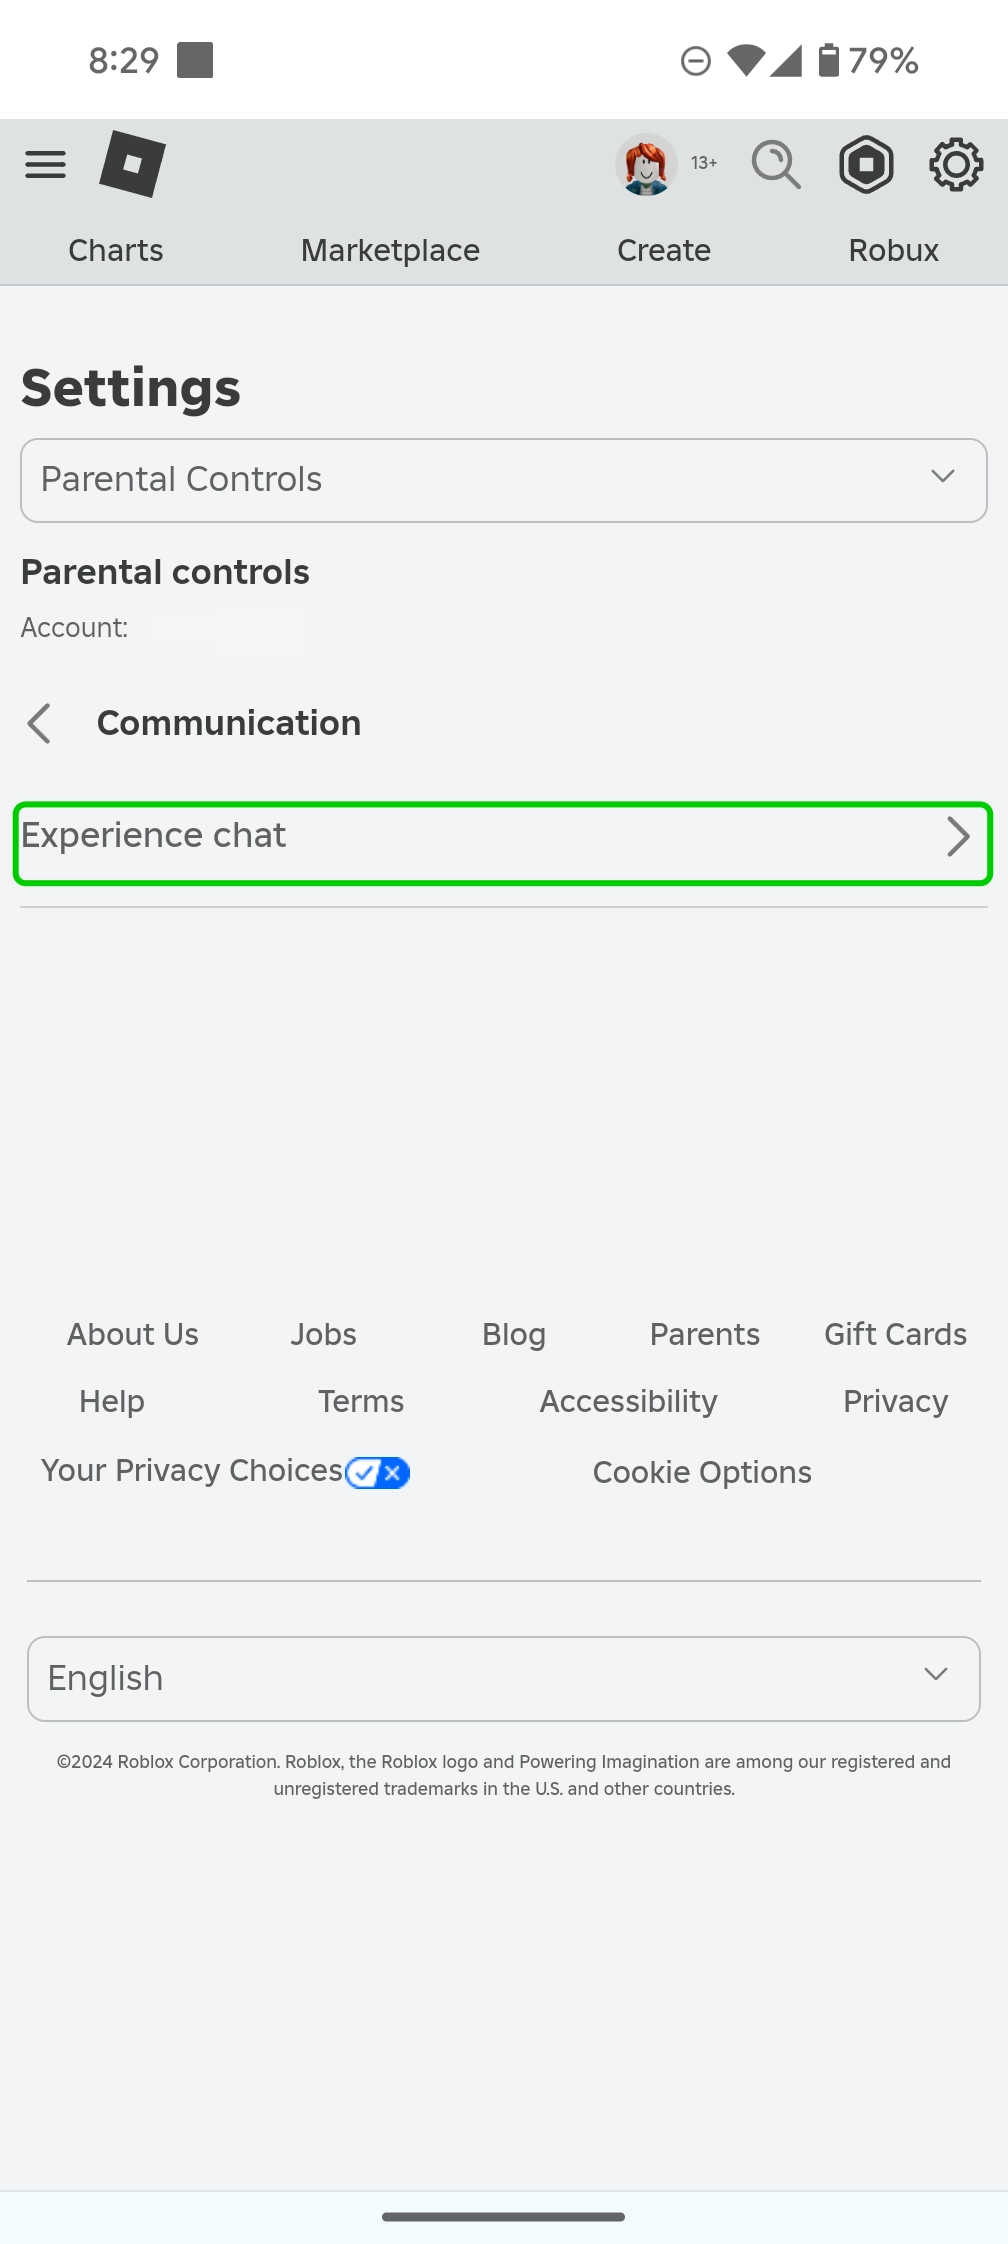
Step 1 – From Settings, access Parental Controls and select Communication.
Step 2 – From within the Communication page, select Chat experience.
Here, you can customise chat filters, who can message your child, who can chat with your child in the app and who can with them.
How to turn on Spending Restrictions
How to turn on Spending Restrictions
Roblox offers ways to help parents manage their children’s in-game spending.
Players must purchase in-game currency called Robux in order to buy items for avatars. Learn more about in-game purchases here.
To manage spending on Roblox:
Step 1 – From the Parental Controls menu, click down to Spending Restrictions.
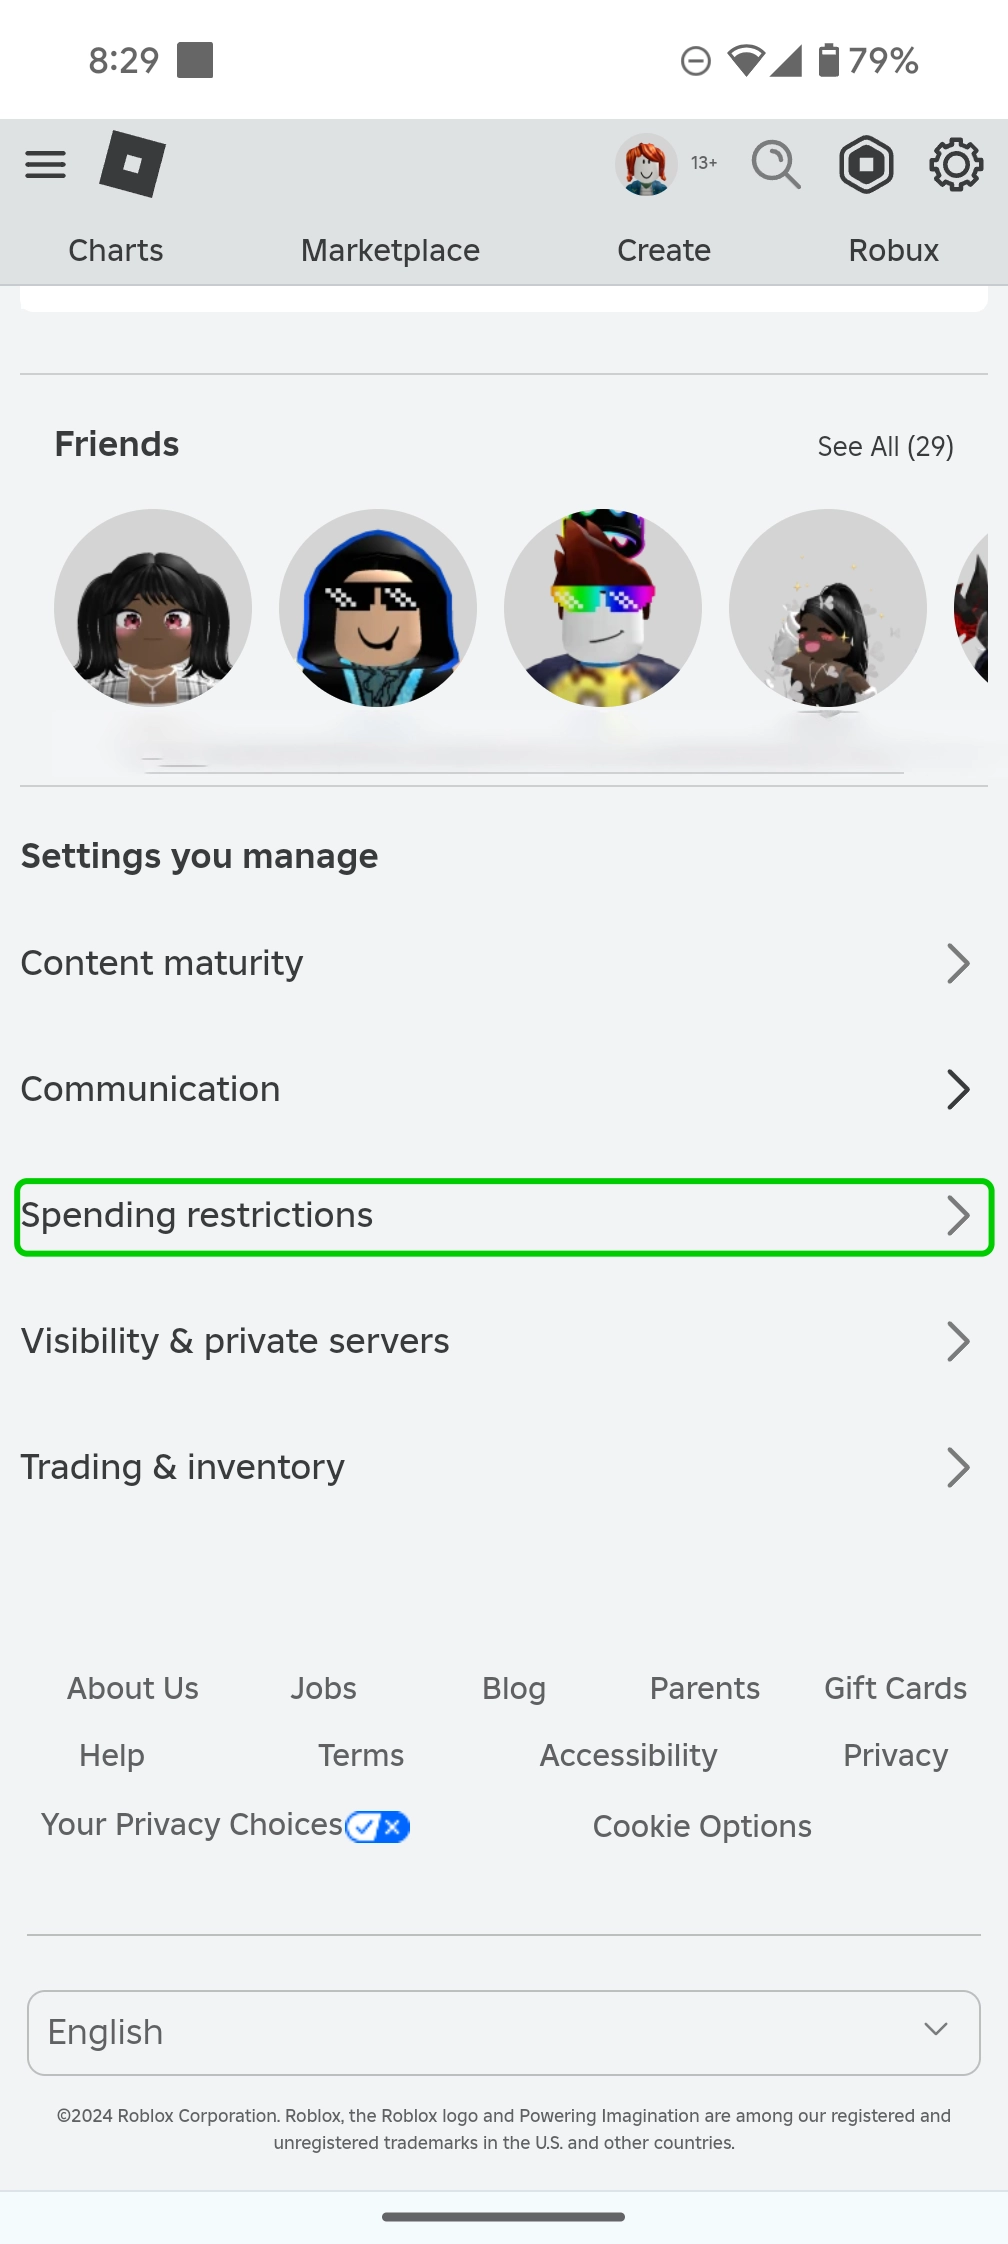
Step 2 – On the Spending Restrictions screen, you have 2 options: to set a Monthly spending limit and to set up Spending notifications.
Monthly Spending Limit: This option allows you to set an amount that your child can spend on Roblox each month. They will not be able to exceed this amount.
Spending notifications: Here you can set how often you receive notifications when your child spends money. You can choose to receive notifications whenever money is spent, only receive notifications for high spend amounts, or not receive notifications at all.

How to set Visibility and private server controls
How to set Visibility and private server controls
The Visibility and private server controls let you decide who can add your child to a private server to game with them. This allows you to prevent strangers from inviting your child to a private game.
To manage visibility and server controls on Roblox:
Step 1 – From the Parental Controls menu, click Visibility and private servers.
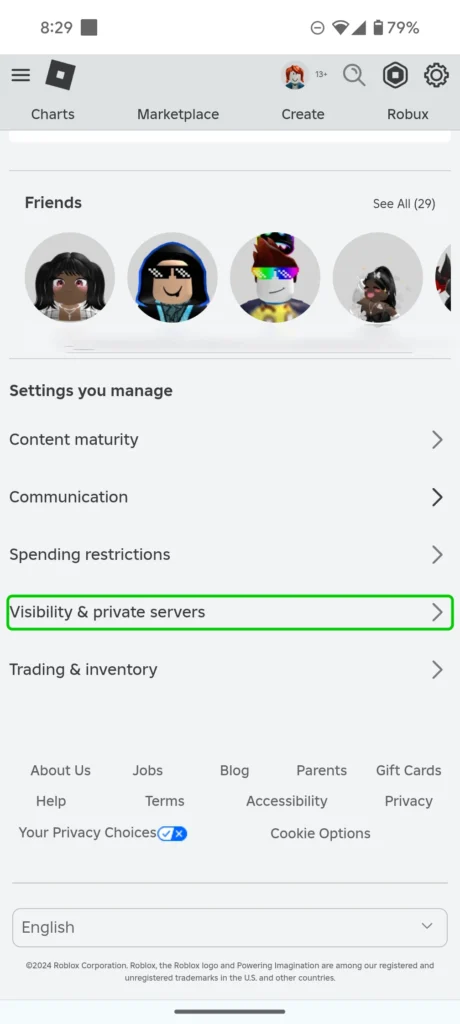
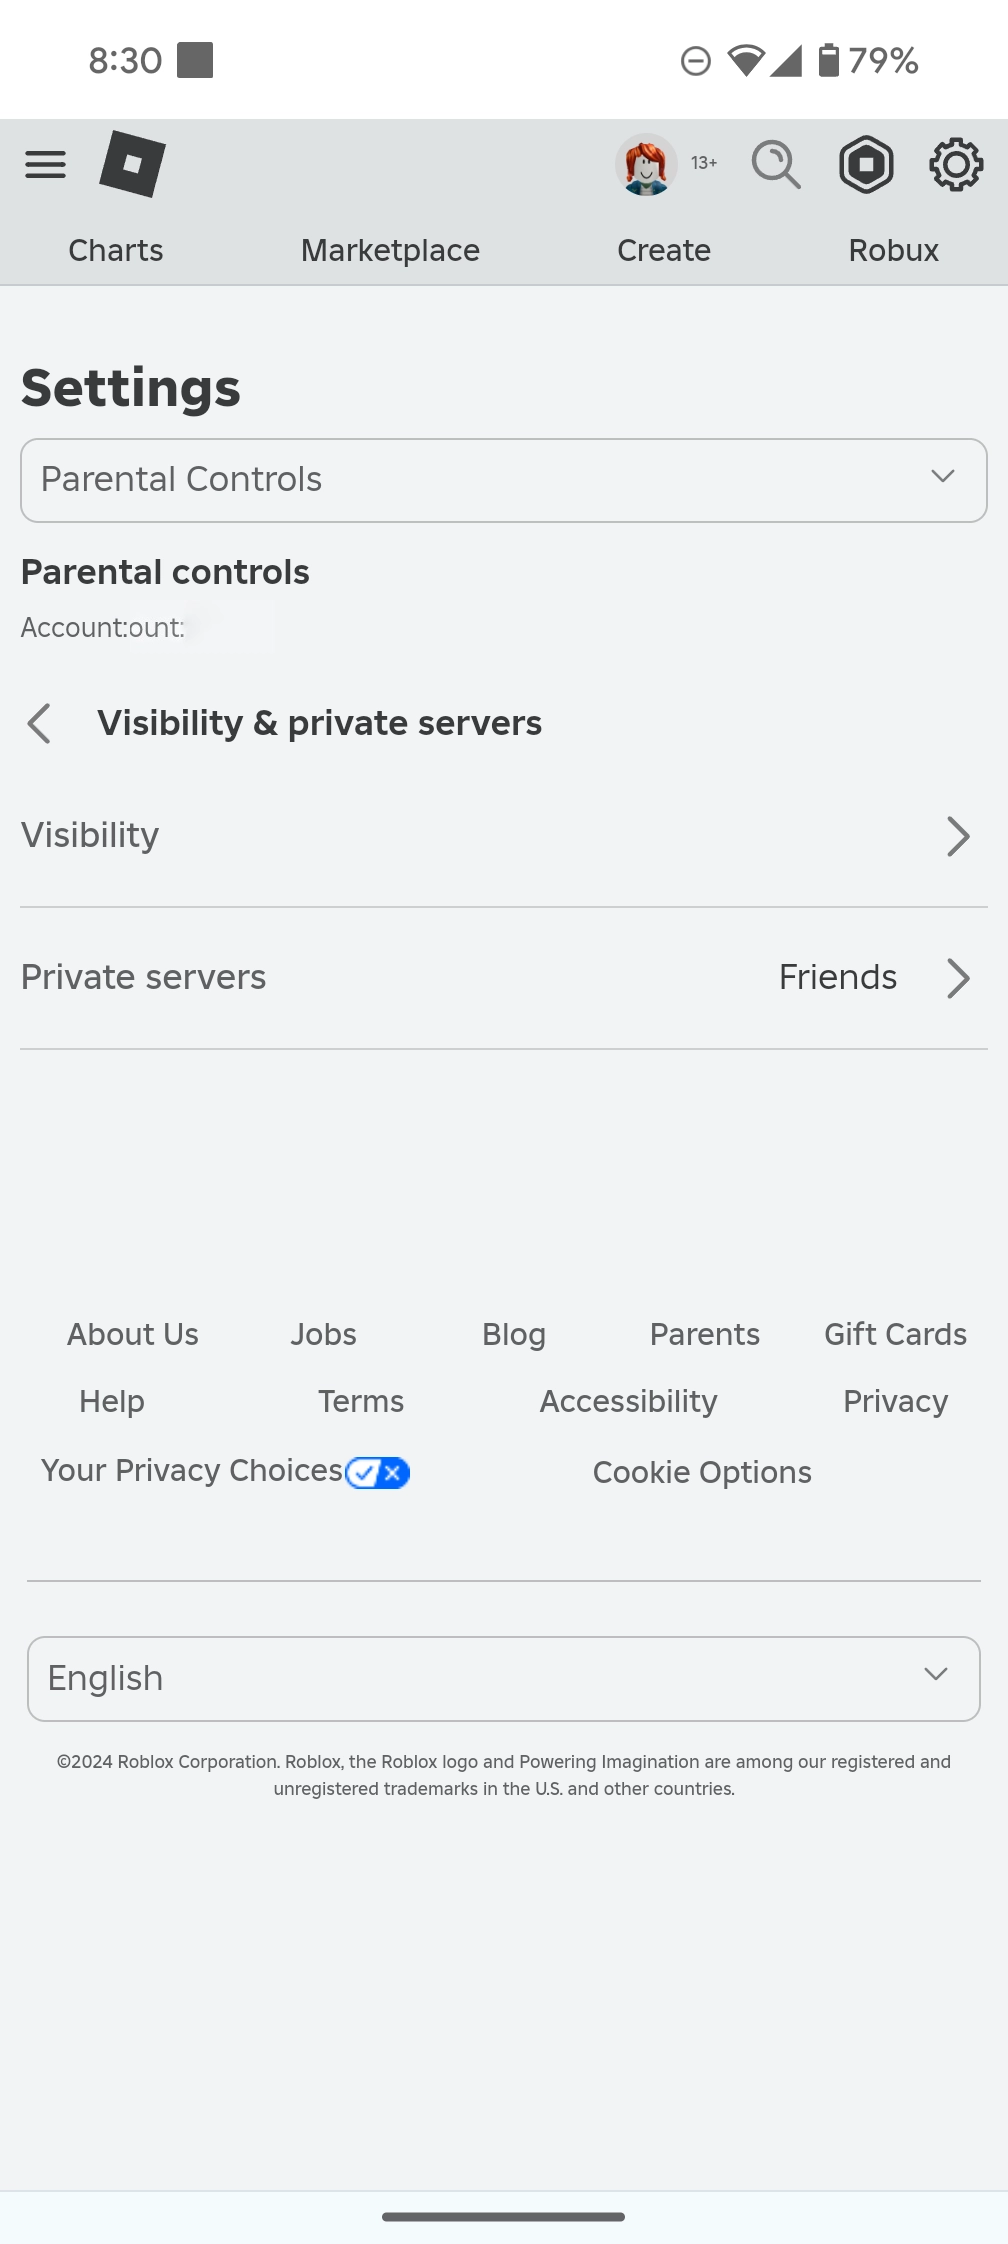
Step 2 – From this screen, you can select two options: Visibility and Private servers.
Visibility: This option allows you to control who can view your child’s profile, and who can see if they are currently online.
Private servers: This lets you control who can invite your child to play in private servers with them. For most children, this should be set to the Friends option, meaning only people your child knows and is already friends with can add them to private sessions.
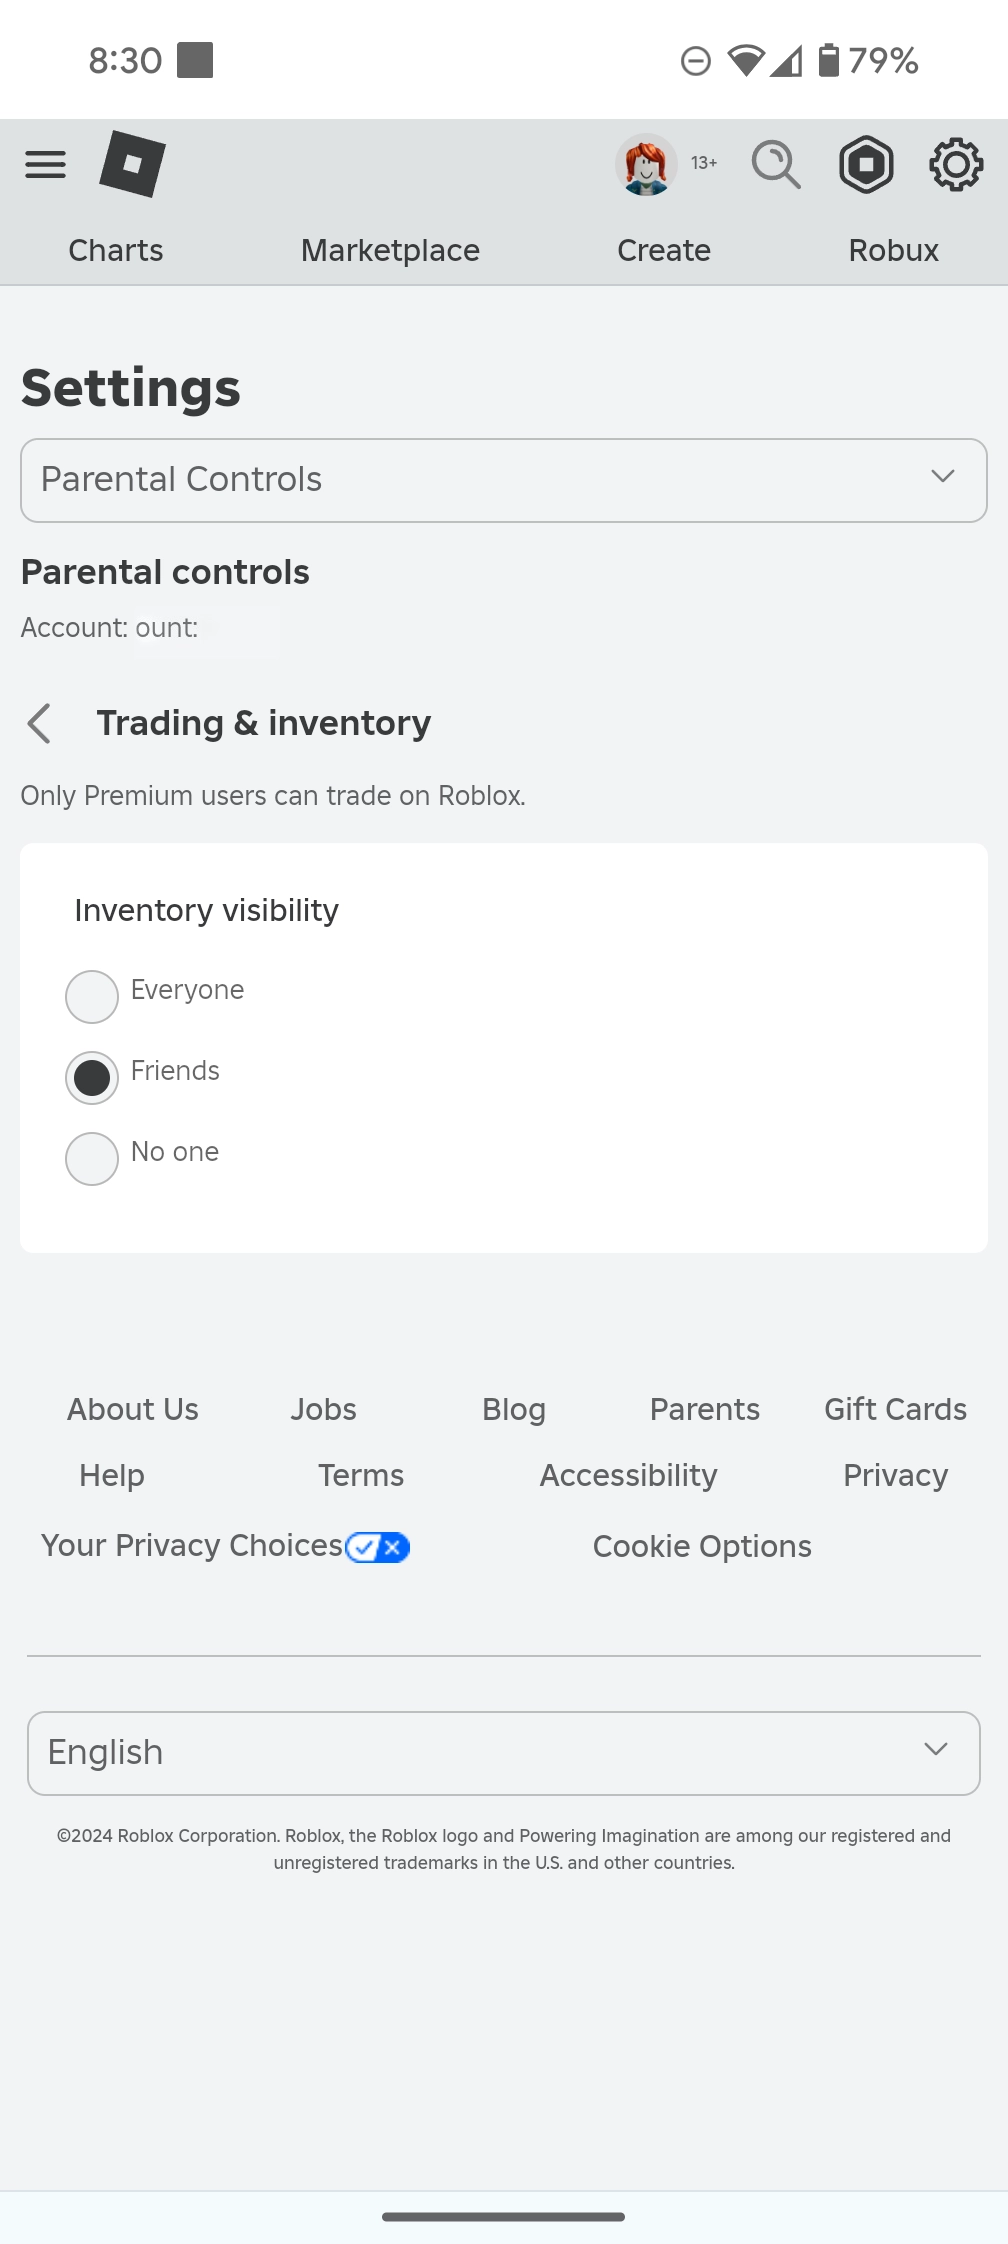
How to manage Trading and inventory settings
How to manage Trading and inventory settings
You can control who can view your child’s inventory on Roblox. This is something that is used when trading, although only premium users have the ability to trade on Roblox.
To control who can view your child’s inventory:
Step 1 – On the Parental Controls menu, select Trading & inventory.

Step 2 – On the Trading & inventory screen, choose who can view your child’s inventory, out of a choice of Everyone, Friends, or No One.
How to report and block users
How to report and block users
To keep Roblox safe for all users, it’s important that your child knows the importance of reporting and blocking users or content that is inappropriate.
Show children how and when to use these functions on the platform.
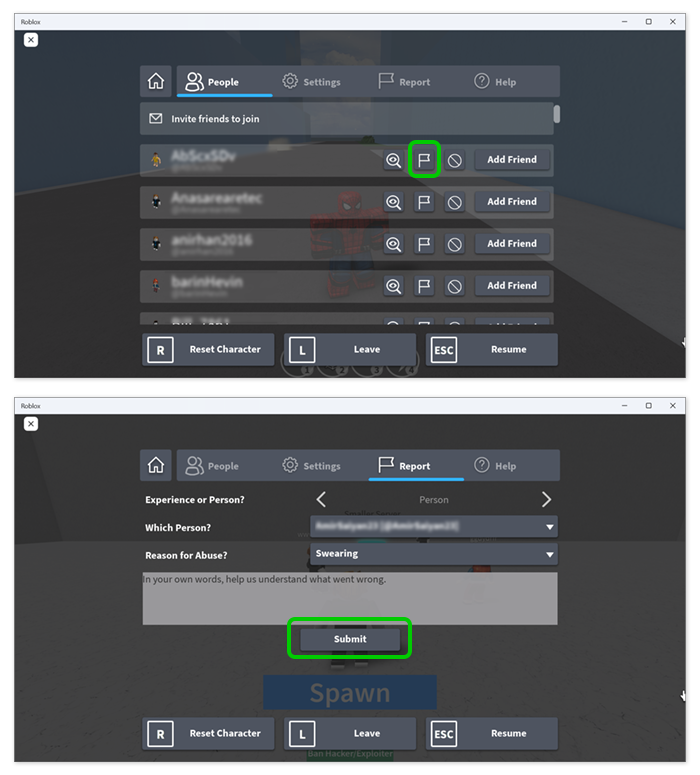
To report users in-game:
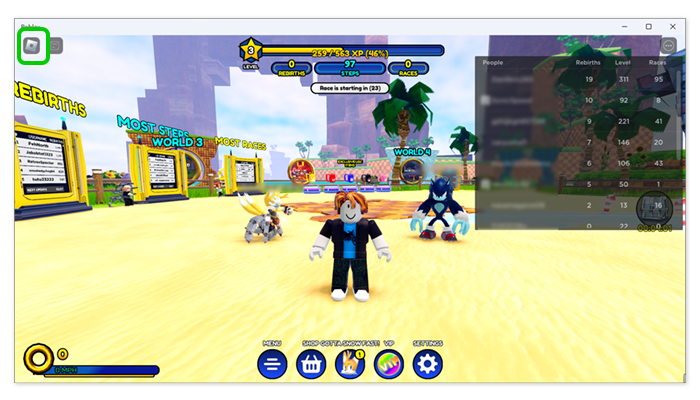
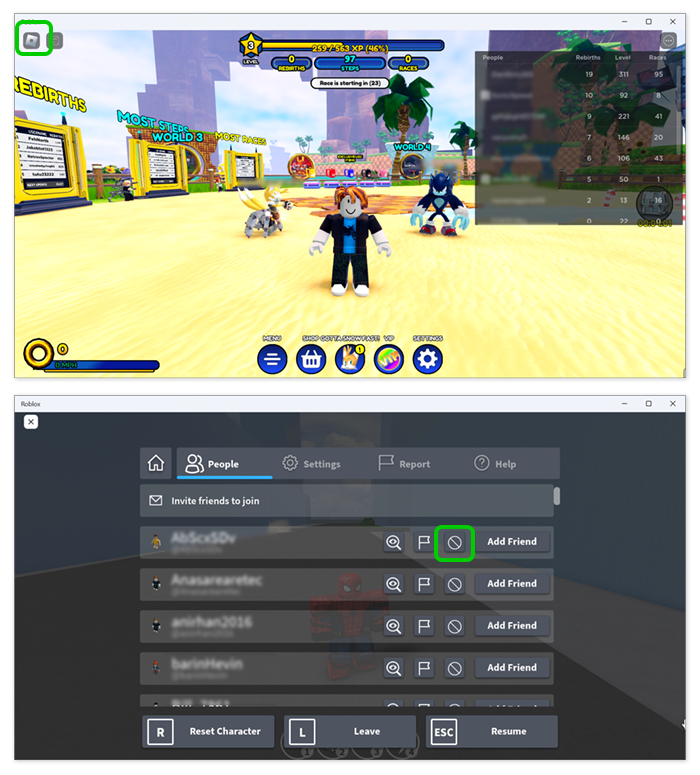
Step 1 – While playing, select the Roblox icon in the top left corner. This will show a list of all users in the current game or lobby under People.
Step 2 – Find the user that you want to report and click the flag next to their name. Fill in the information for why the user needs to be reported.
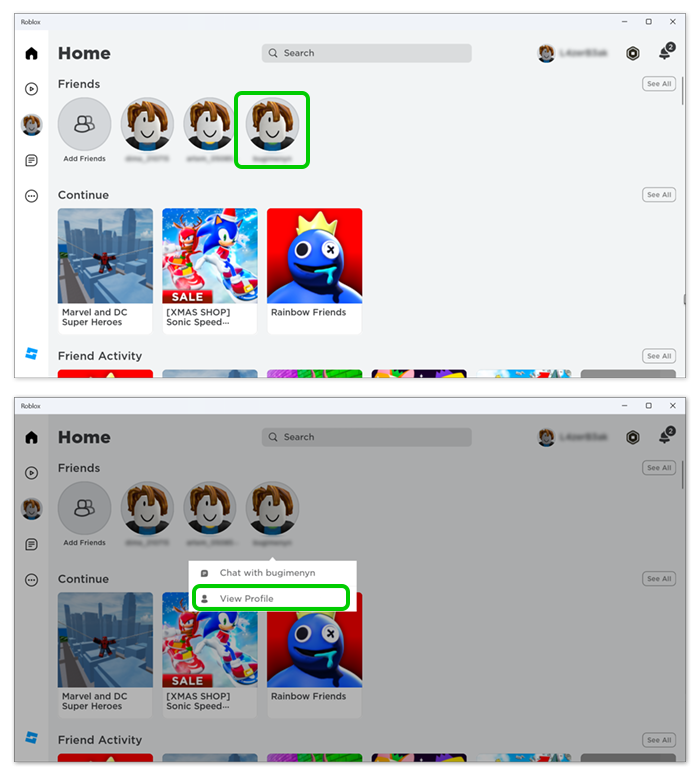
To report friends on Roblox:
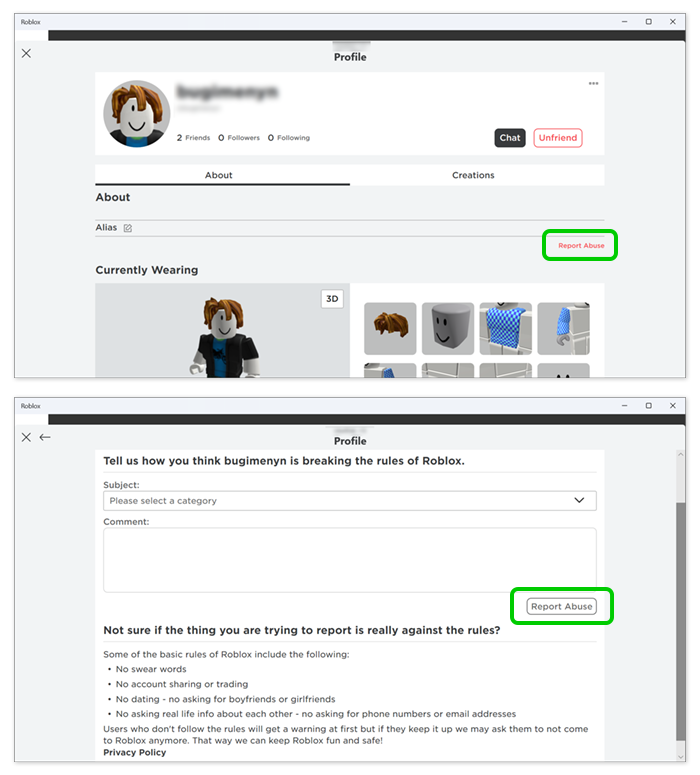
Step 3 – From the main page on Roblox, click on the friend’s profile image and select View Profile.
Step 4 – On the friend’s profile, select Report Abuse and then fill in information about why you’re reporting the user.
To report content on Roblox:
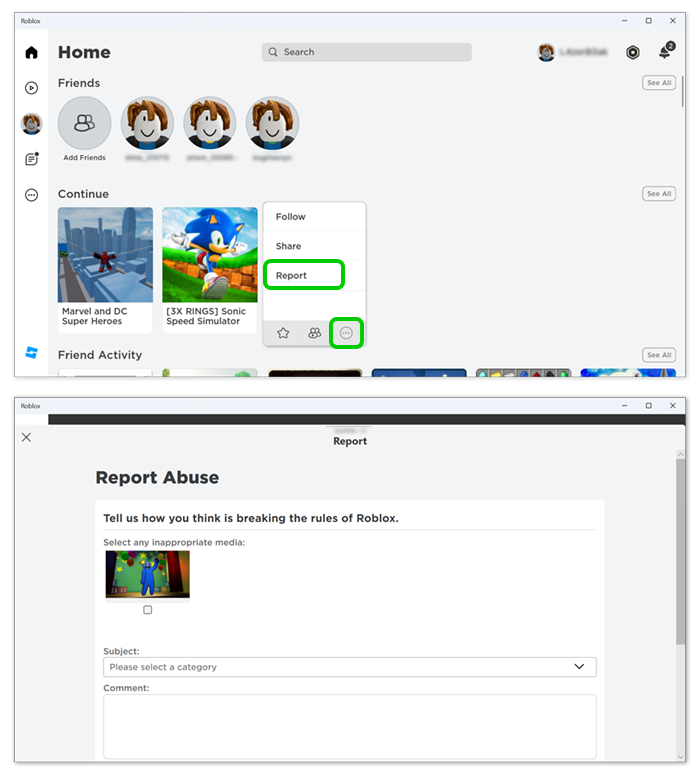
Step 5 – From the main page on Roblox, hover over the game or experience you want to report. Select the 3 dots icon > Report.
On the following page, explain why the content you’re reporting is inappropriate for Roblox.
Where can I block someone on Roblox?
Where can I block someone on Roblox?
Encourage your child to block other users who make them or other users uncomfortable or angry.
To block a user on Roblox:
Step 1 – In-game, select the Roblox icon in the corner of the screen to see a list of people.
Step 2 – Find the person you wish to block, and click on the circle with the line through it.
You can also block a user from their profile.
Blocking specific friends
Blocking specific friends
Parents can block specific accounts in their child’s friends list with whom they do not want their child direct messaging.
To block your child’s friend:
Step 1 – From the Parental controls menu, scroll to your child’s Friends list and click Manage.
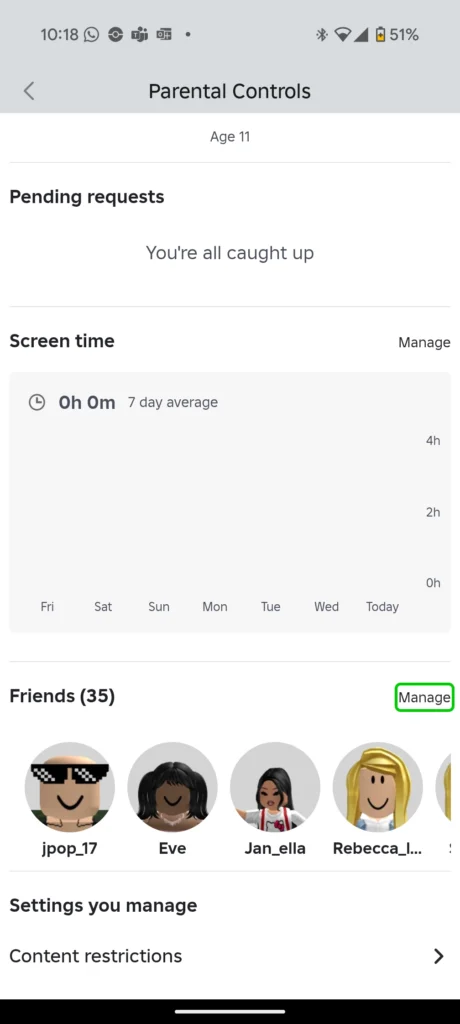
Step 2 – Scroll to the account that you would like to block, click the 3 vertical dots next to the account’s name.

Step 3 – When the Confirm Block pop up appears on screen, click Block.

The friend will now be blocked and unable to contact your child at all on Roblox. Parents have the option to unblock them at any time. Children under the age of 13 cannot unblock users their parents have blocked. They can, however, send a request to their parent or caregiver to ask them to do so.
Turn on 2-step verification
Turn on 2-step verification
2-step verification can add an additional layer of security to your child’s account. It also means that your child will need you to approve their use of Roblox, which you can discuss before they play.
You must have a verified email to enable this feature.
To turn on 2-step verification:
Step 1 – Log into your account, then go to Account Settings. Select the Privacy tab.
Step 2 – Adjust the Contact Settings and Other Settings. Select the Security tab, then turn Two-Step Verification on.
How to set Roblox parental controls
- How to set up a parent account
- Linking your account to your child’s
- How to manage screen time on Roblox
- How to set Content Maturity level
- Blocking specific experiences
- Where can I manage communication settings?
- How to turn on Spending Restrictions
- How to set Visibility and private server controls
- How to manage Trading and inventory settings
- How to report and block users
- Where can I block someone on Roblox?
- Blocking specific friends
- Turn on 2-step verification
- More resources
View more guides
Discover more parental controls to manage children’s devices, apps and platforms for safer online experiences.